What Is DNS Hijacking? [+ Examples & Protection Tips]
DNS hijacking is a type of attack where attackers manipulate DNS responses to redirect users to unauthorized or malicious destinations. This can involve compromising DNS servers, altering domain records, or intercepting DNS traffic.
The technique enables credential theft, malware distribution, and impersonation of legitimate services.
How does a DNS hijacking attack work?
DNS hijacking attacks manipulate how domain names resolve to IP addresses.
Basically, the attacker interferes with DNS responses to reroute users to a site under their control—and the user often doesn’t notice the redirection.
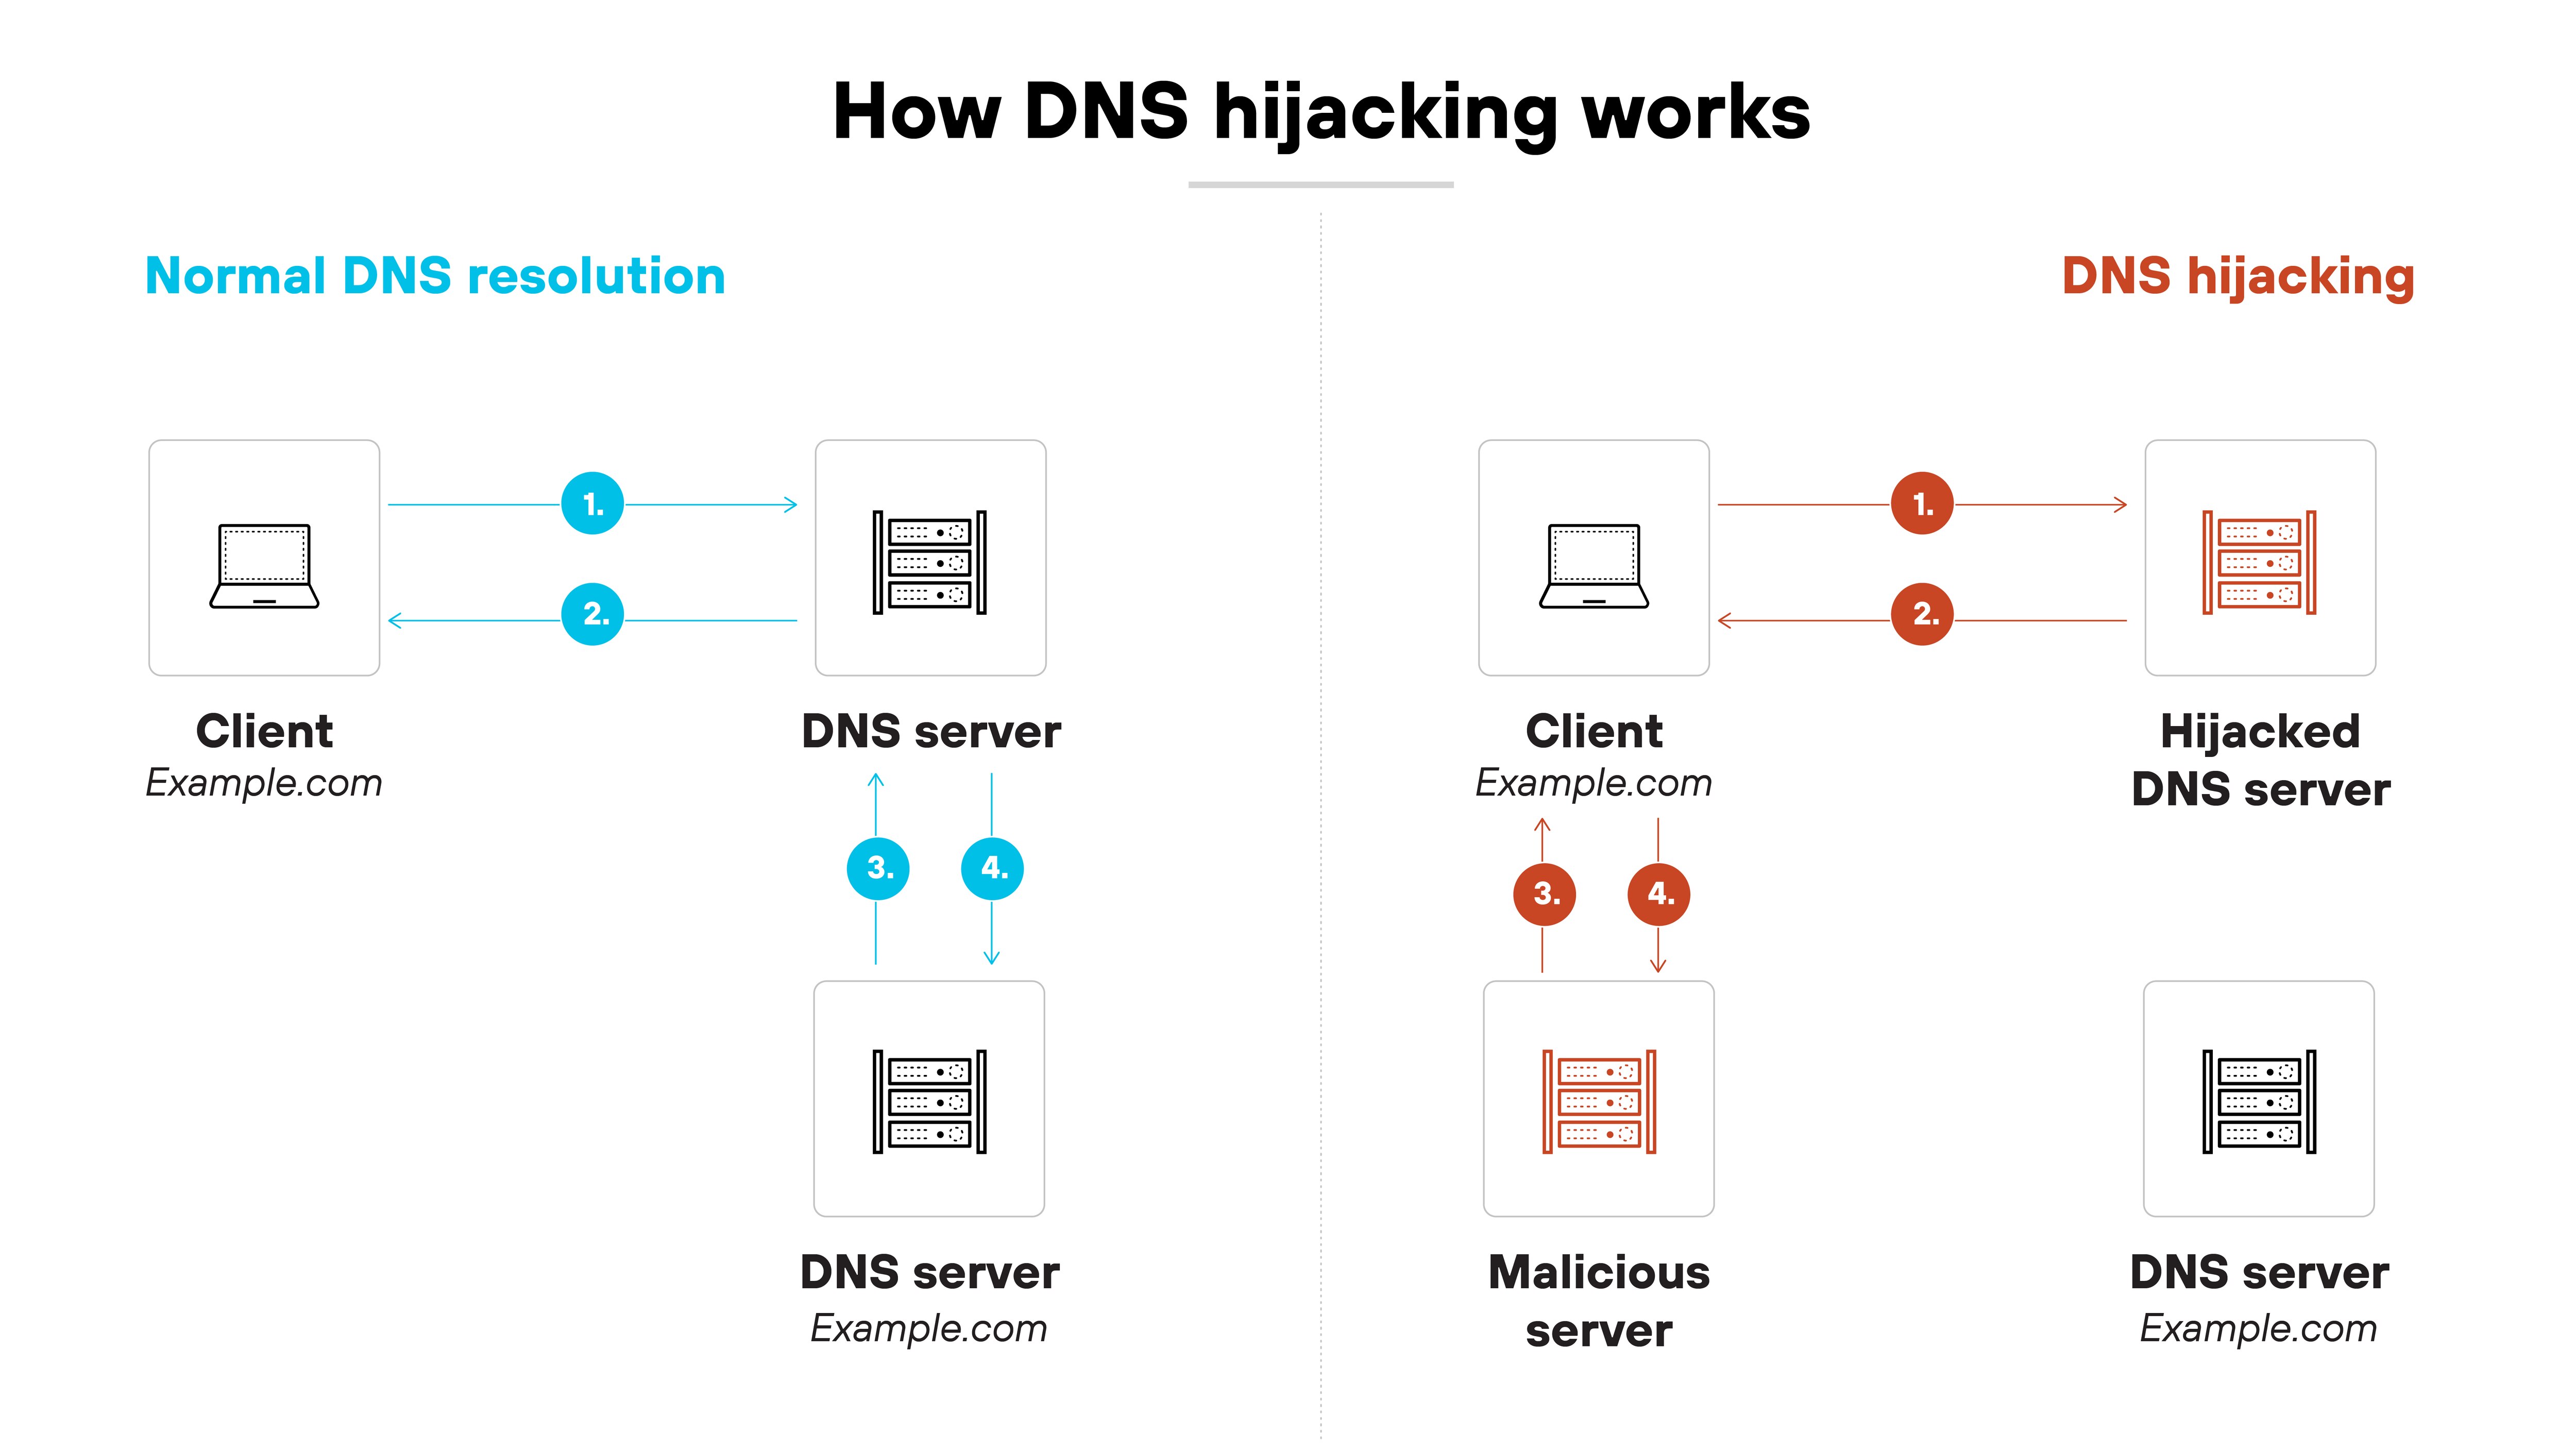
Here's how a typical DNS hijacking attack works, step by step:
-
The attacker identifies a target
This could be a public website, internal domain, or DNS provider account. The attacker looks for weak points in the DNS infrastructure or admin access.
-
The attacker gains access
They might steal credentials, exploit vulnerabilities, or use social engineering to compromise DNS servers, registrar accounts, or local routers.
-
The attacker modifies DNS settings
They change DNS records or inject forged responses to redirect traffic from the legitimate IP address to a maliciousone.
-
The user submits a DNS query
The user tries to visit a domain as usual—typing the address in a browser or using an app that initiates a connection.
-
The query resolves to the attacker's IP
Instead of reaching the real server, the DNS response points to a server controlled by the attacker.
-
The user reaches a fake or malicious destination
That could be a phishing site, malware host, or an impersonation of the original service. Everything appears normal unless the user checks the certificate or inspects the site closely.
In other cases, the attacker doesn't change official DNS records. Instead, they intercept queries in transit and respond with spoofed data.
If the DNS traffic isn't encrypted or verified, the forged response is accepted. The user gets redirected silently, even though nothing changed in the DNS configuration itself.
What are the different types of DNS hijacking attacks?
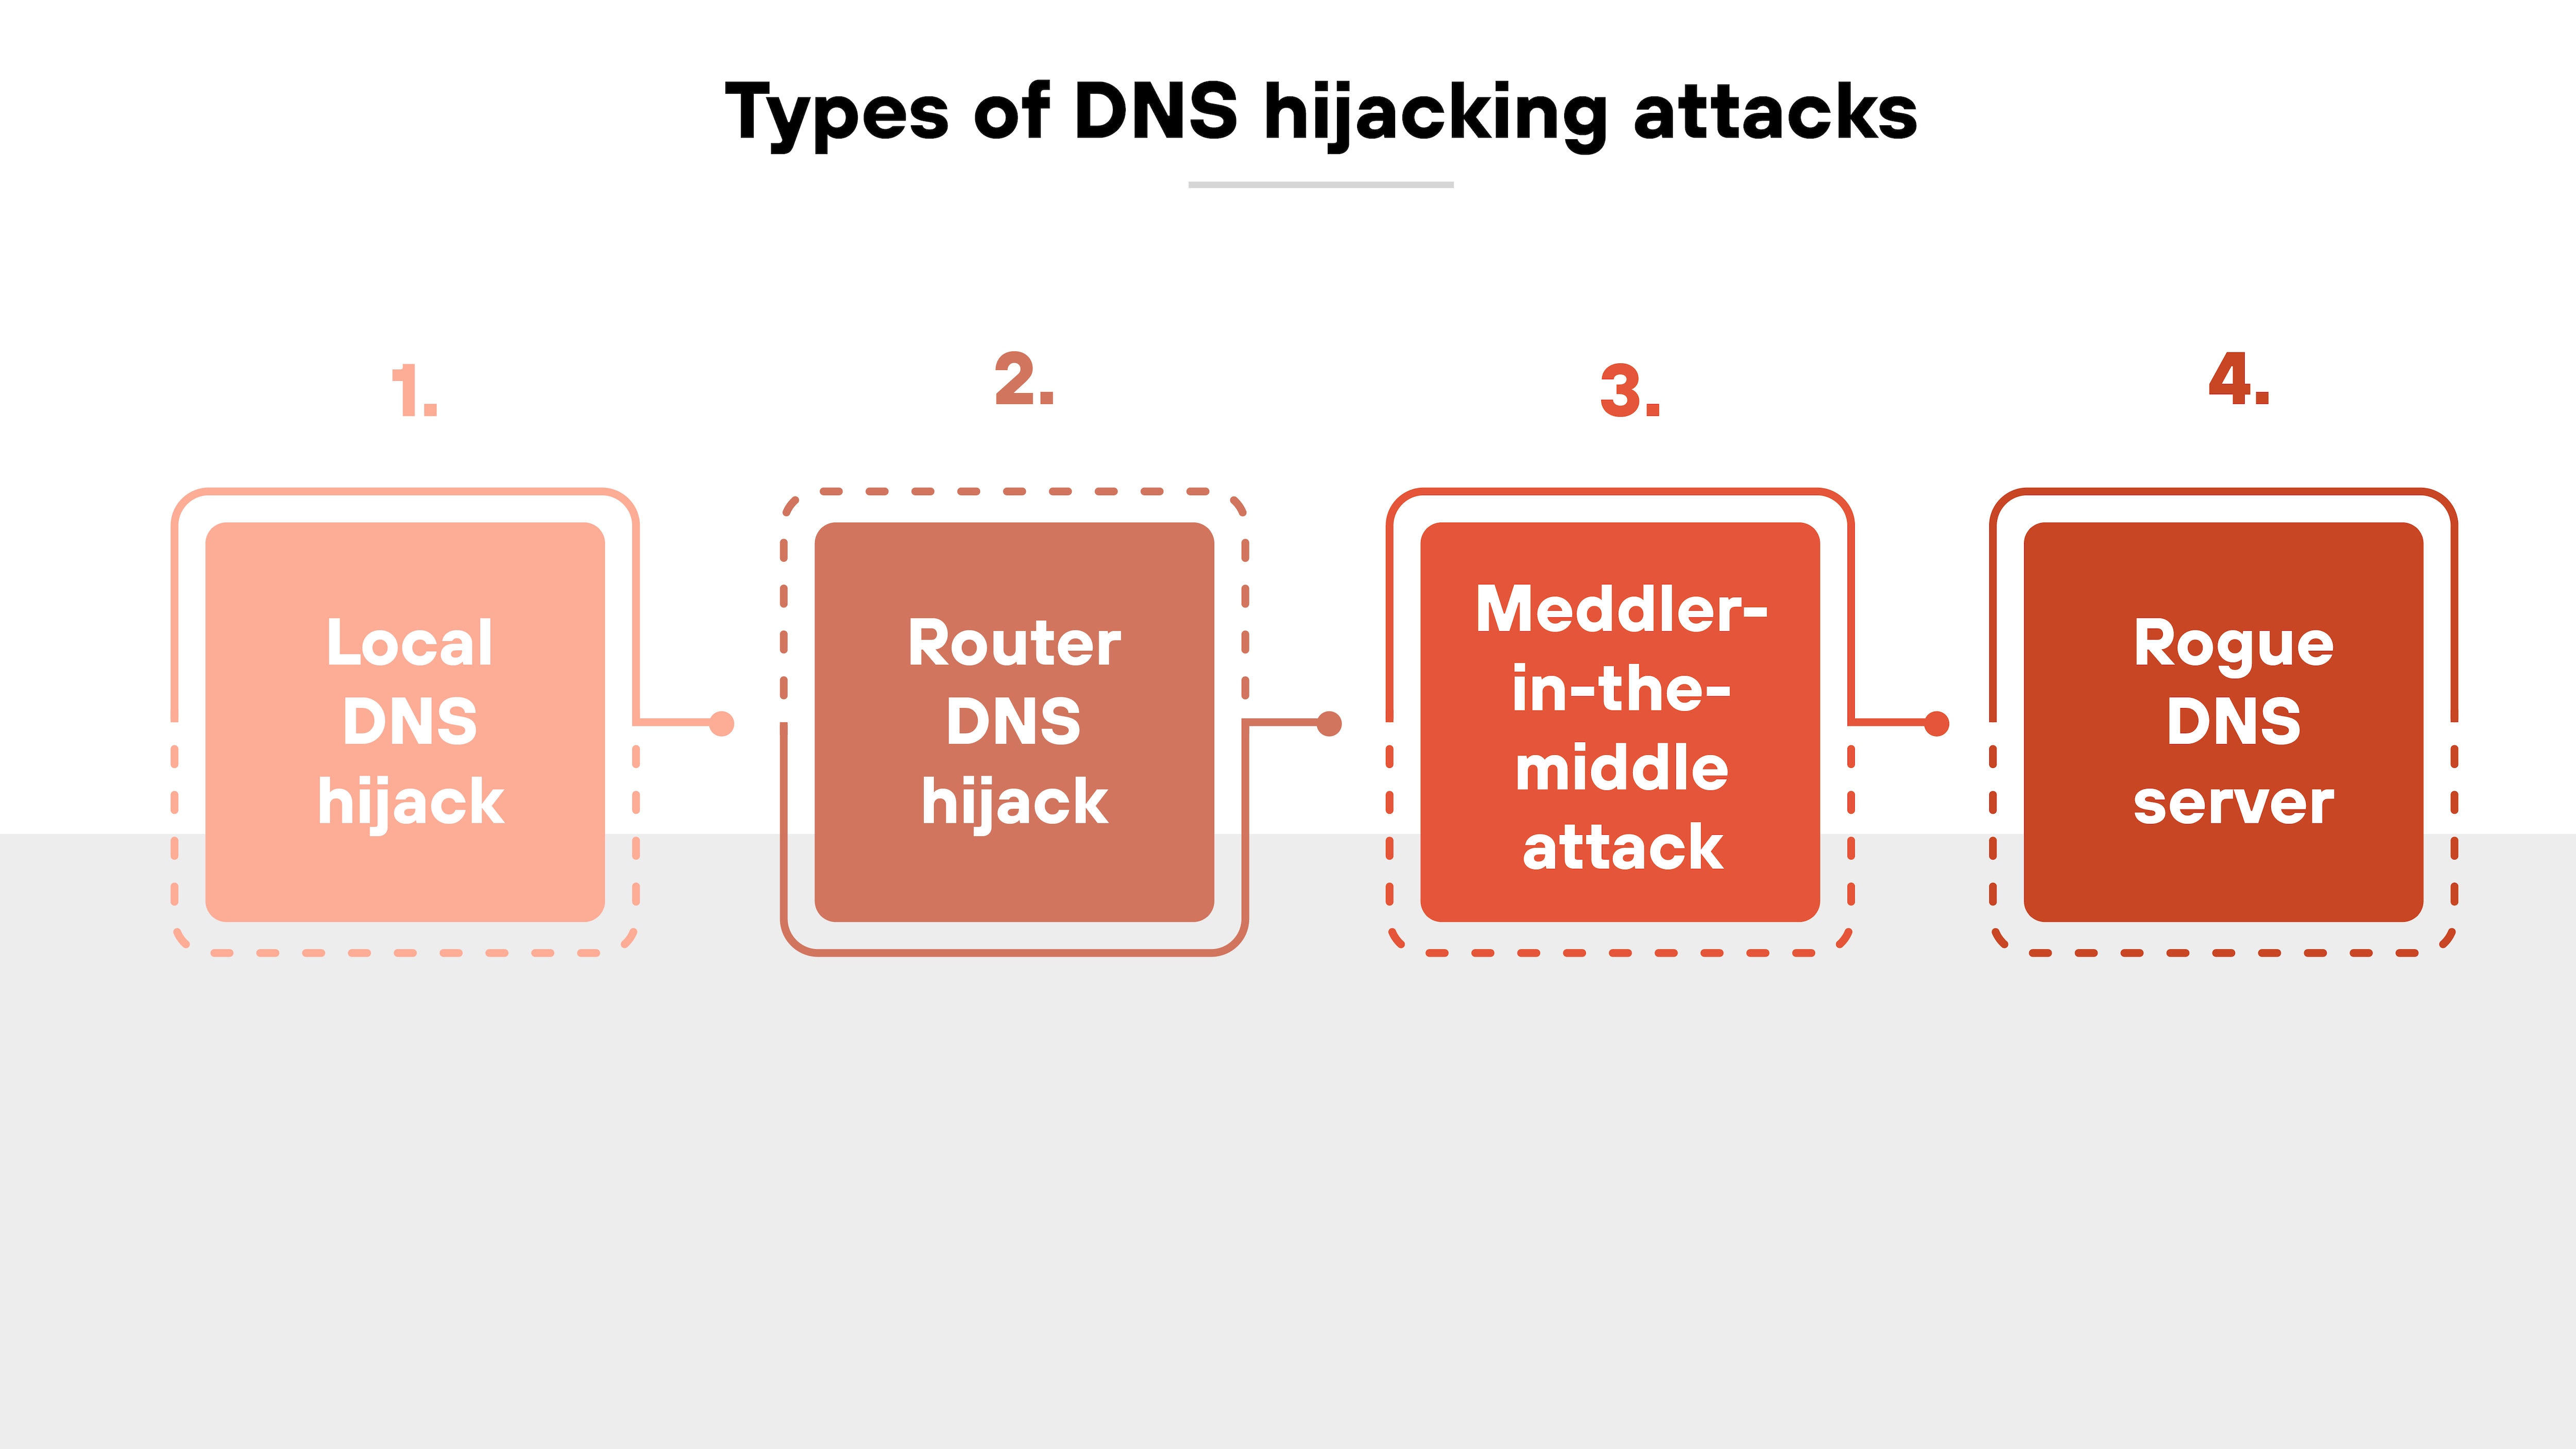
There are several distinct techniques attackers use to carry out DNS hijacking. Each one targets a different part of the DNS resolution process—from individual devices to network infrastructure.
Understanding how these attack types differ helps clarify the scale, risk, and response required for each.
Let’s take a closer look:
Local DNS hijack
In a local DNS hijack, the attacker compromises a specific device. This often involves installing malware that modifies DNS settings on the host system. Once the local resolver is changed, all DNS queries from that device can be redirected.
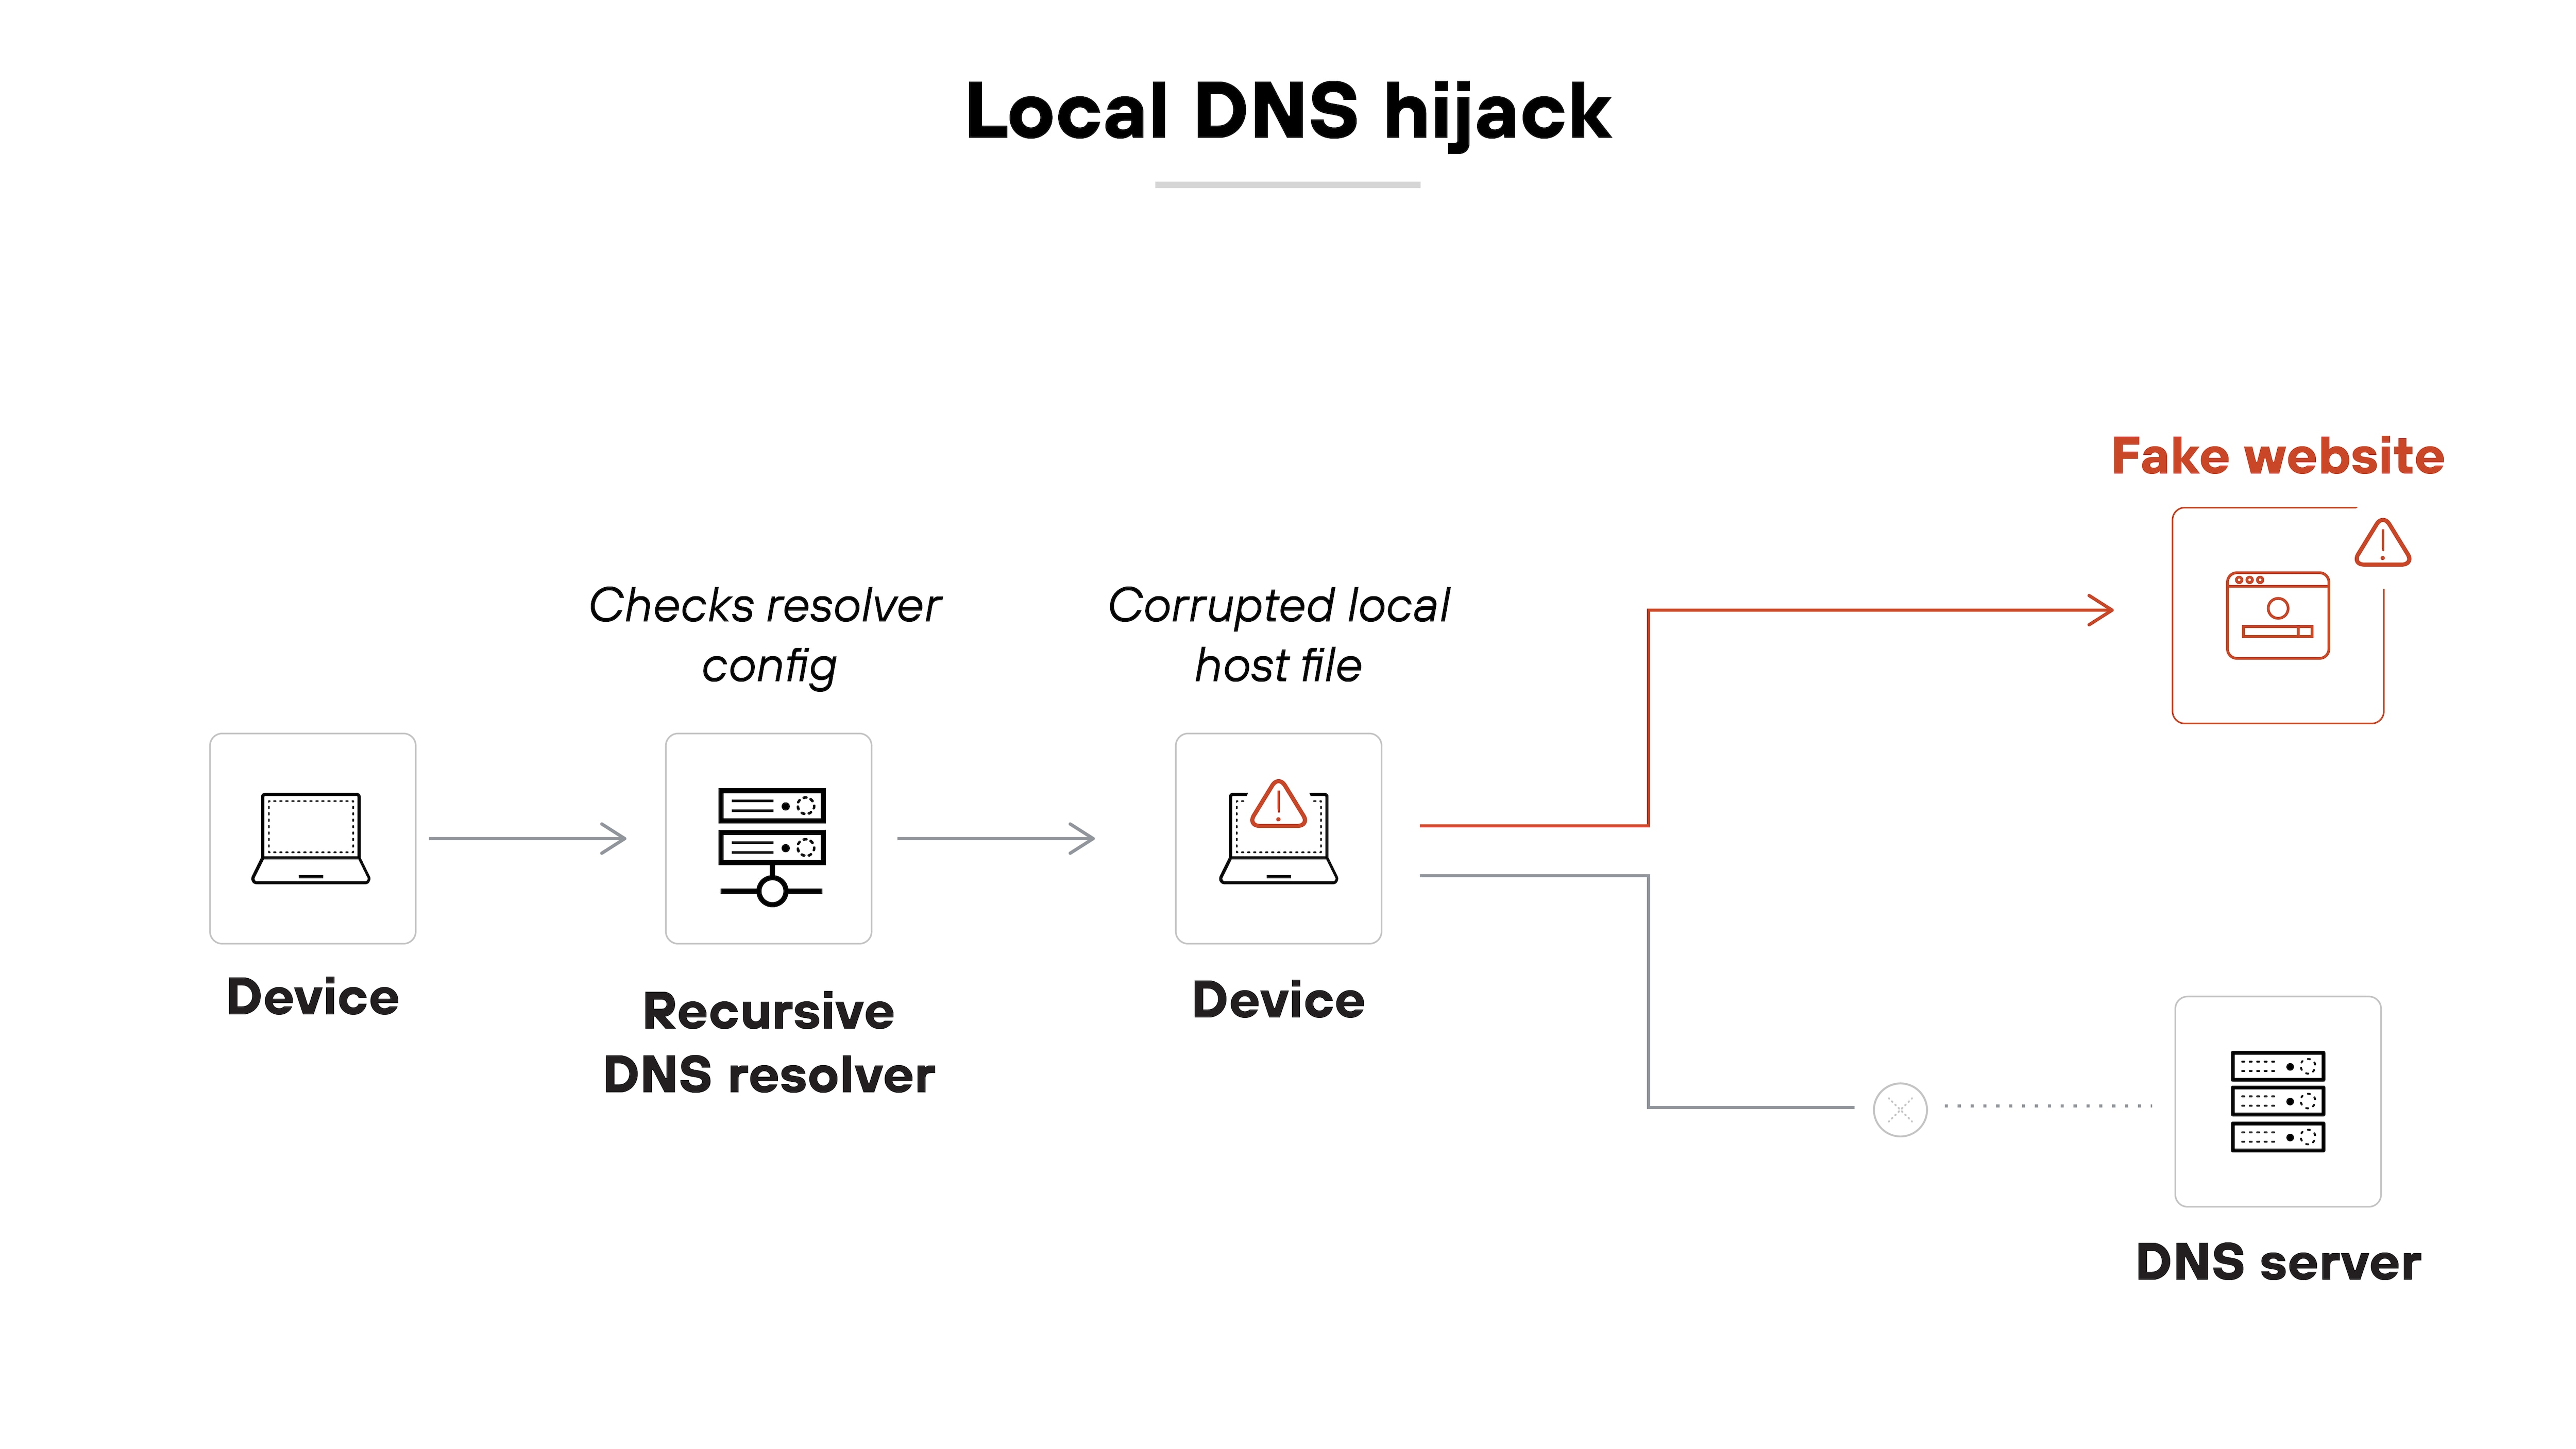
Here’s why that’s important:
Even if the organization’s upstream DNS infrastructure remains secure, the infected device will still receive malicious responses. The attacker’s DNS server can now return forged IP addresses for any domain the user attempts to reach. The user ends up on a spoofed site without realizing anything has changed.
Example: MyEtherWallet attack (2018)
In 2018, attackers used malware to alter local DNS settings on users' machines and redirect traffic from MyEtherWallet to a fake website.
The spoofed site prompted users to enter private wallet keys, which the attackers then used to steal their cryptocurrency. This local DNS hijack resulted in over $150,000 in reported losses.
Router DNS hijack
Router DNS hijacks target the network gateway instead of individual devices. Attackers scan for routers with default credentials or known firmware vulnerabilities. Once they gain access, they update the router’s DNS configuration.
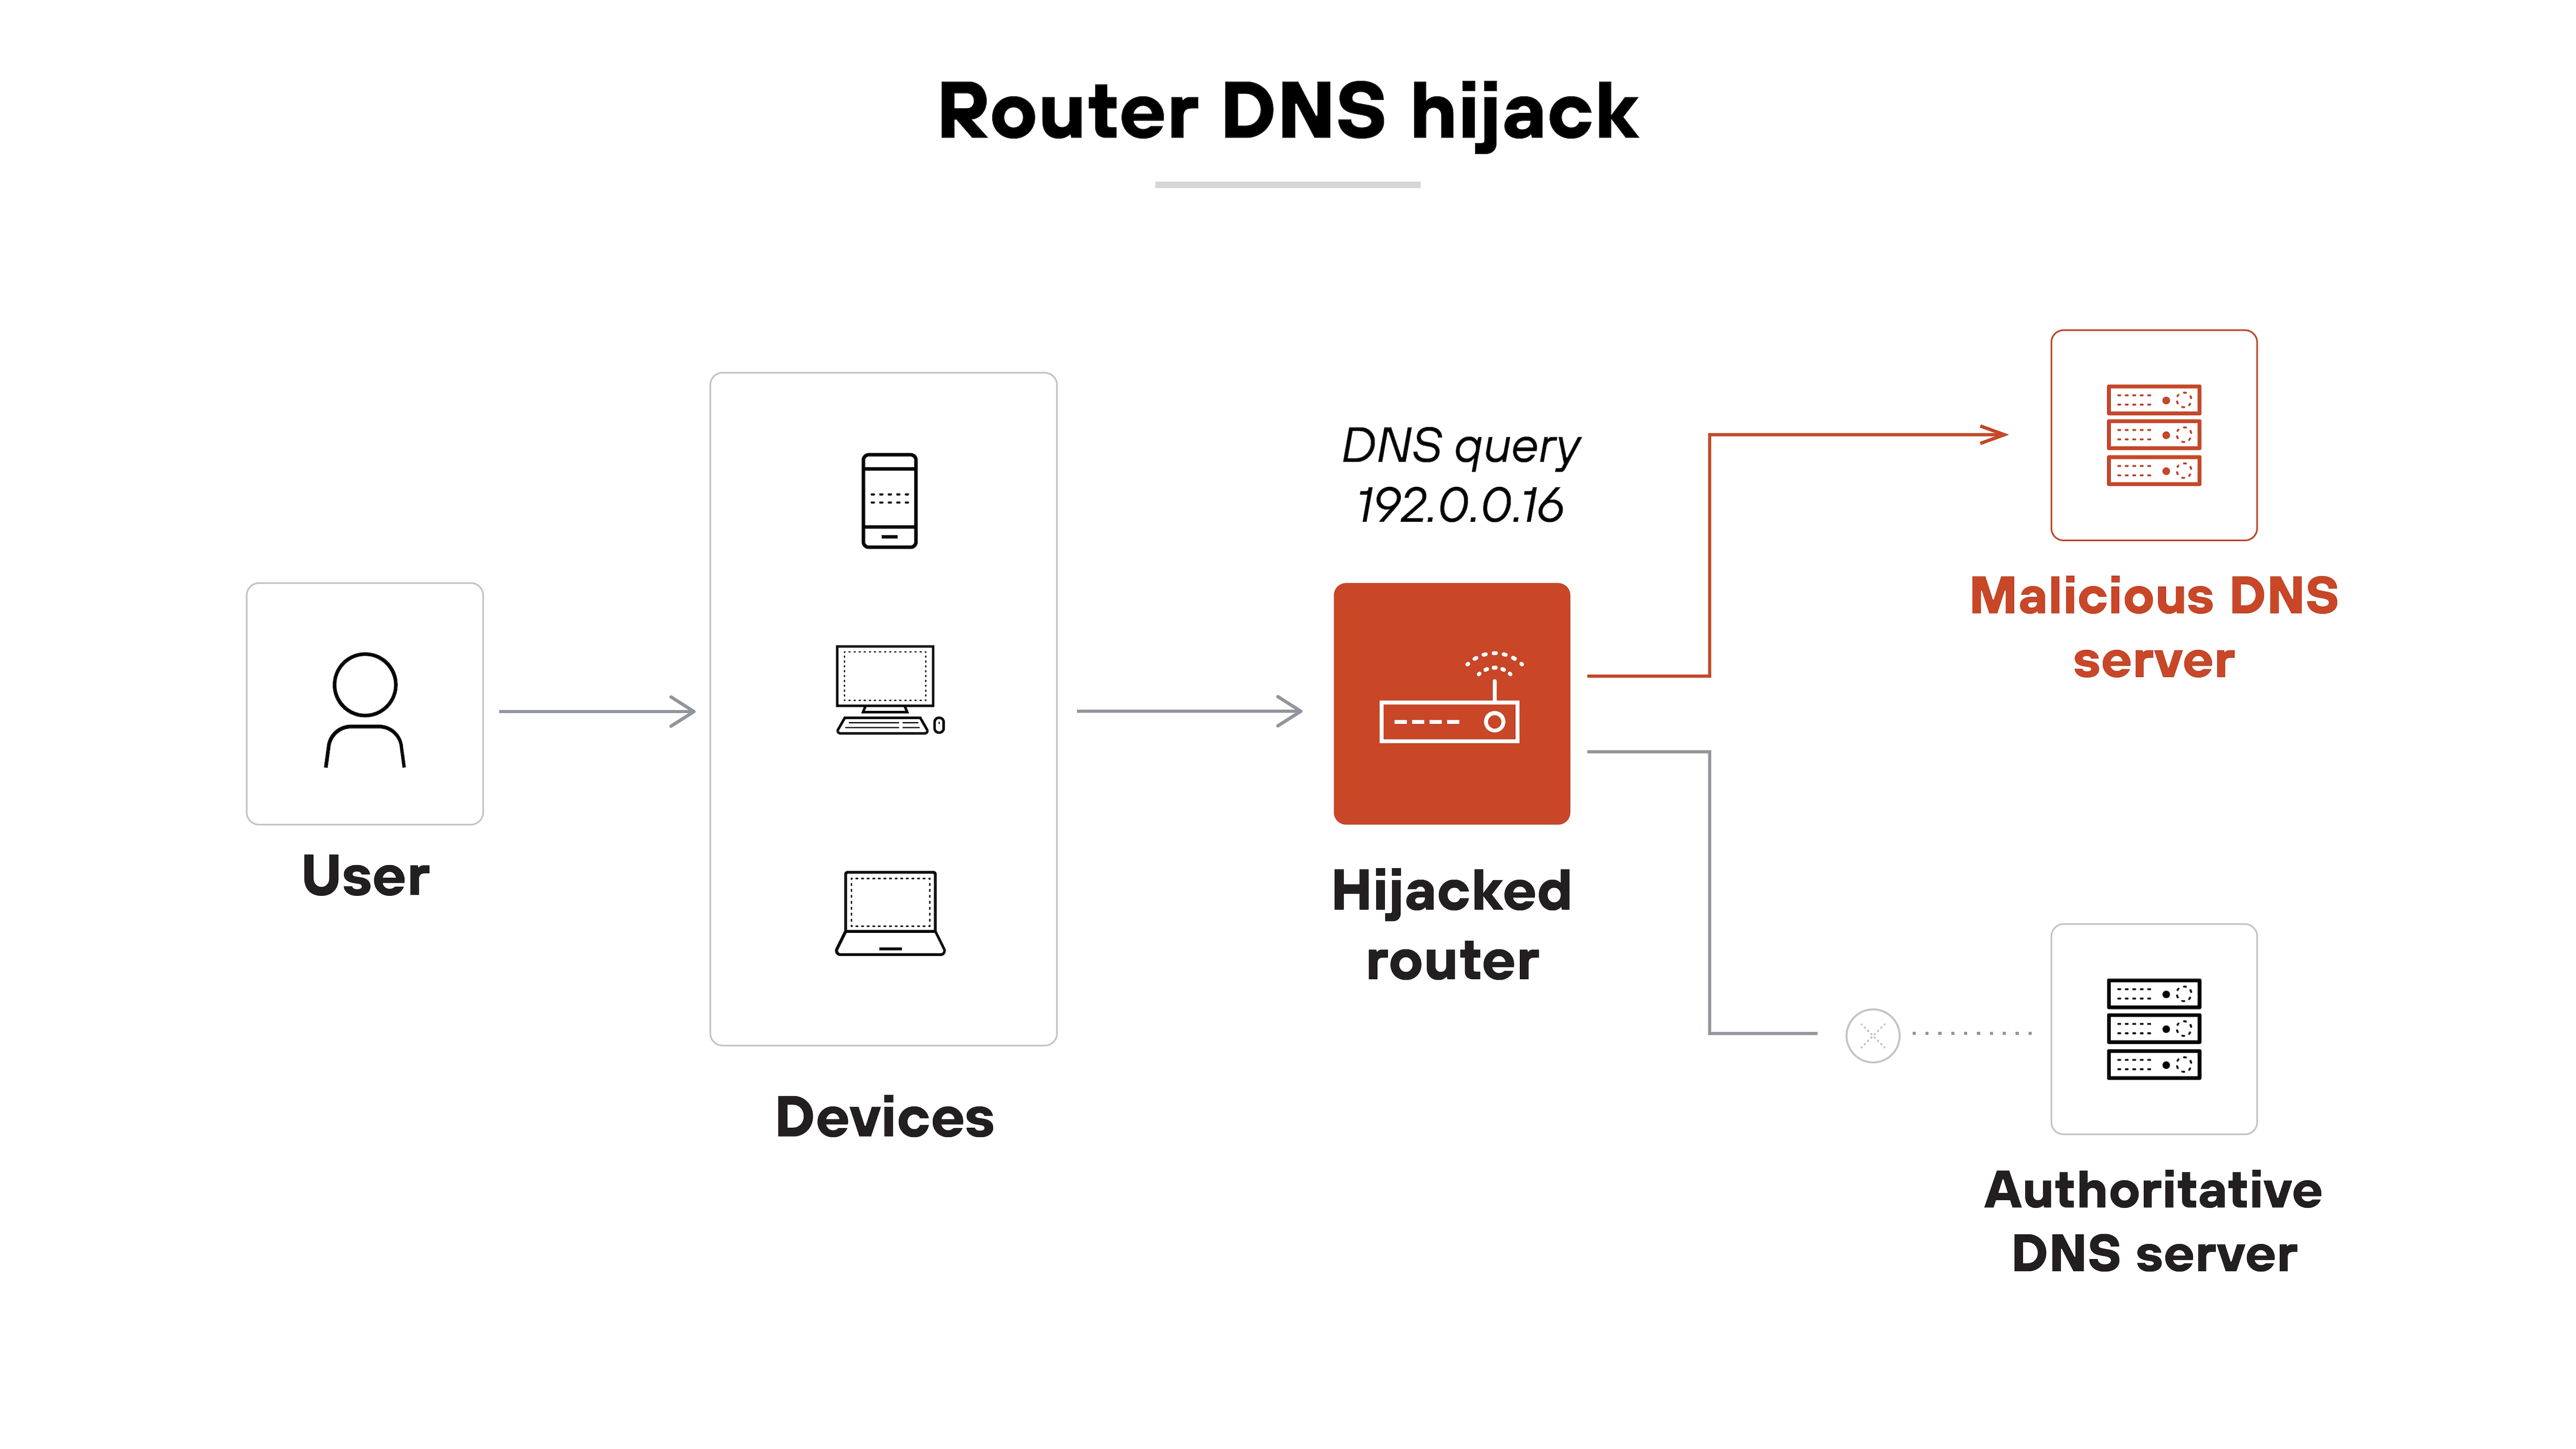
The impact is broader. Every device on the network that uses the router’s DNS settings will be redirected. That makes it especially dangerous in home or small office environments where users rarely check router settings. In other words: one compromised router can hijack DNS for an entire network.
Example: Unpatched D-Link Routers Targeted (2019)
In 2019, attackers exploited vulnerabilities in unpatched D-Link routers, altering their DNS settings to redirect users to malicious websites.
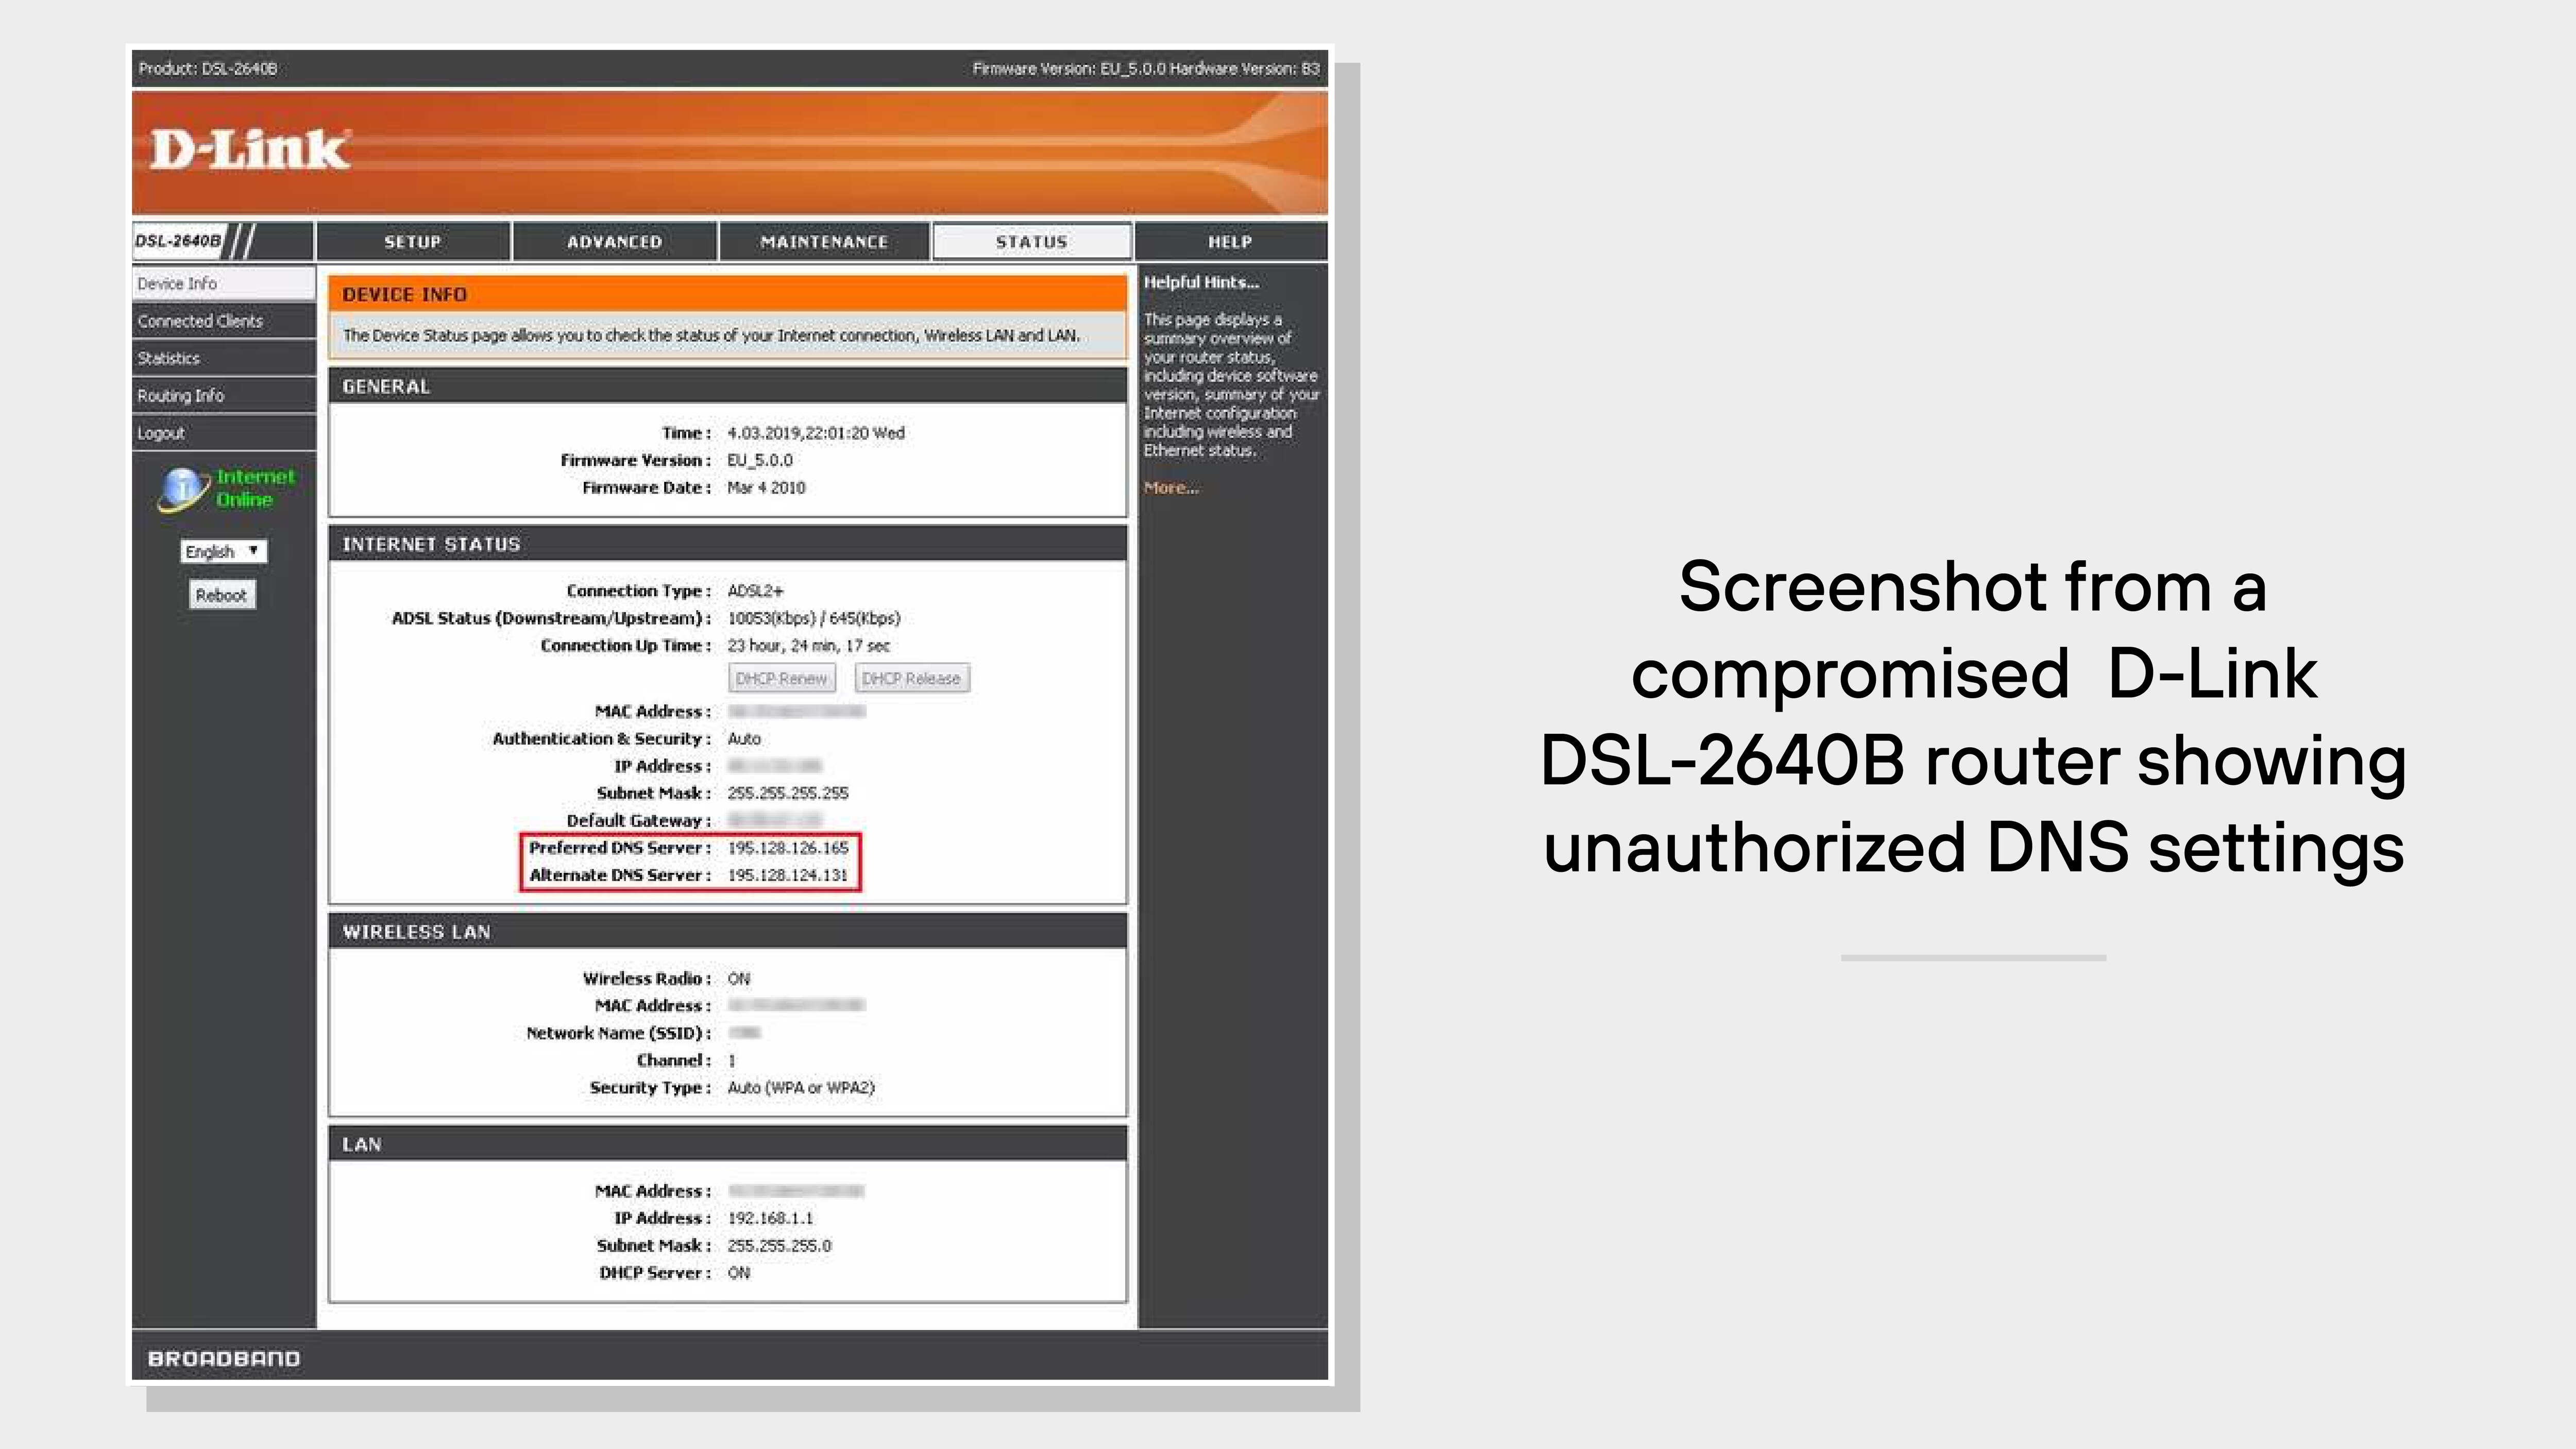
The compromised routers pointed DNS requests to rogue servers hosted by OVH Canada and later to servers in Russia, affecting numerous users.
Meddler-in-the-middle attacks
These attacks exploit the space between a user’s query and the DNS server’s response. So, the attacker sits in the communication path and injects a forged DNS reply before the legitimate server can respond.
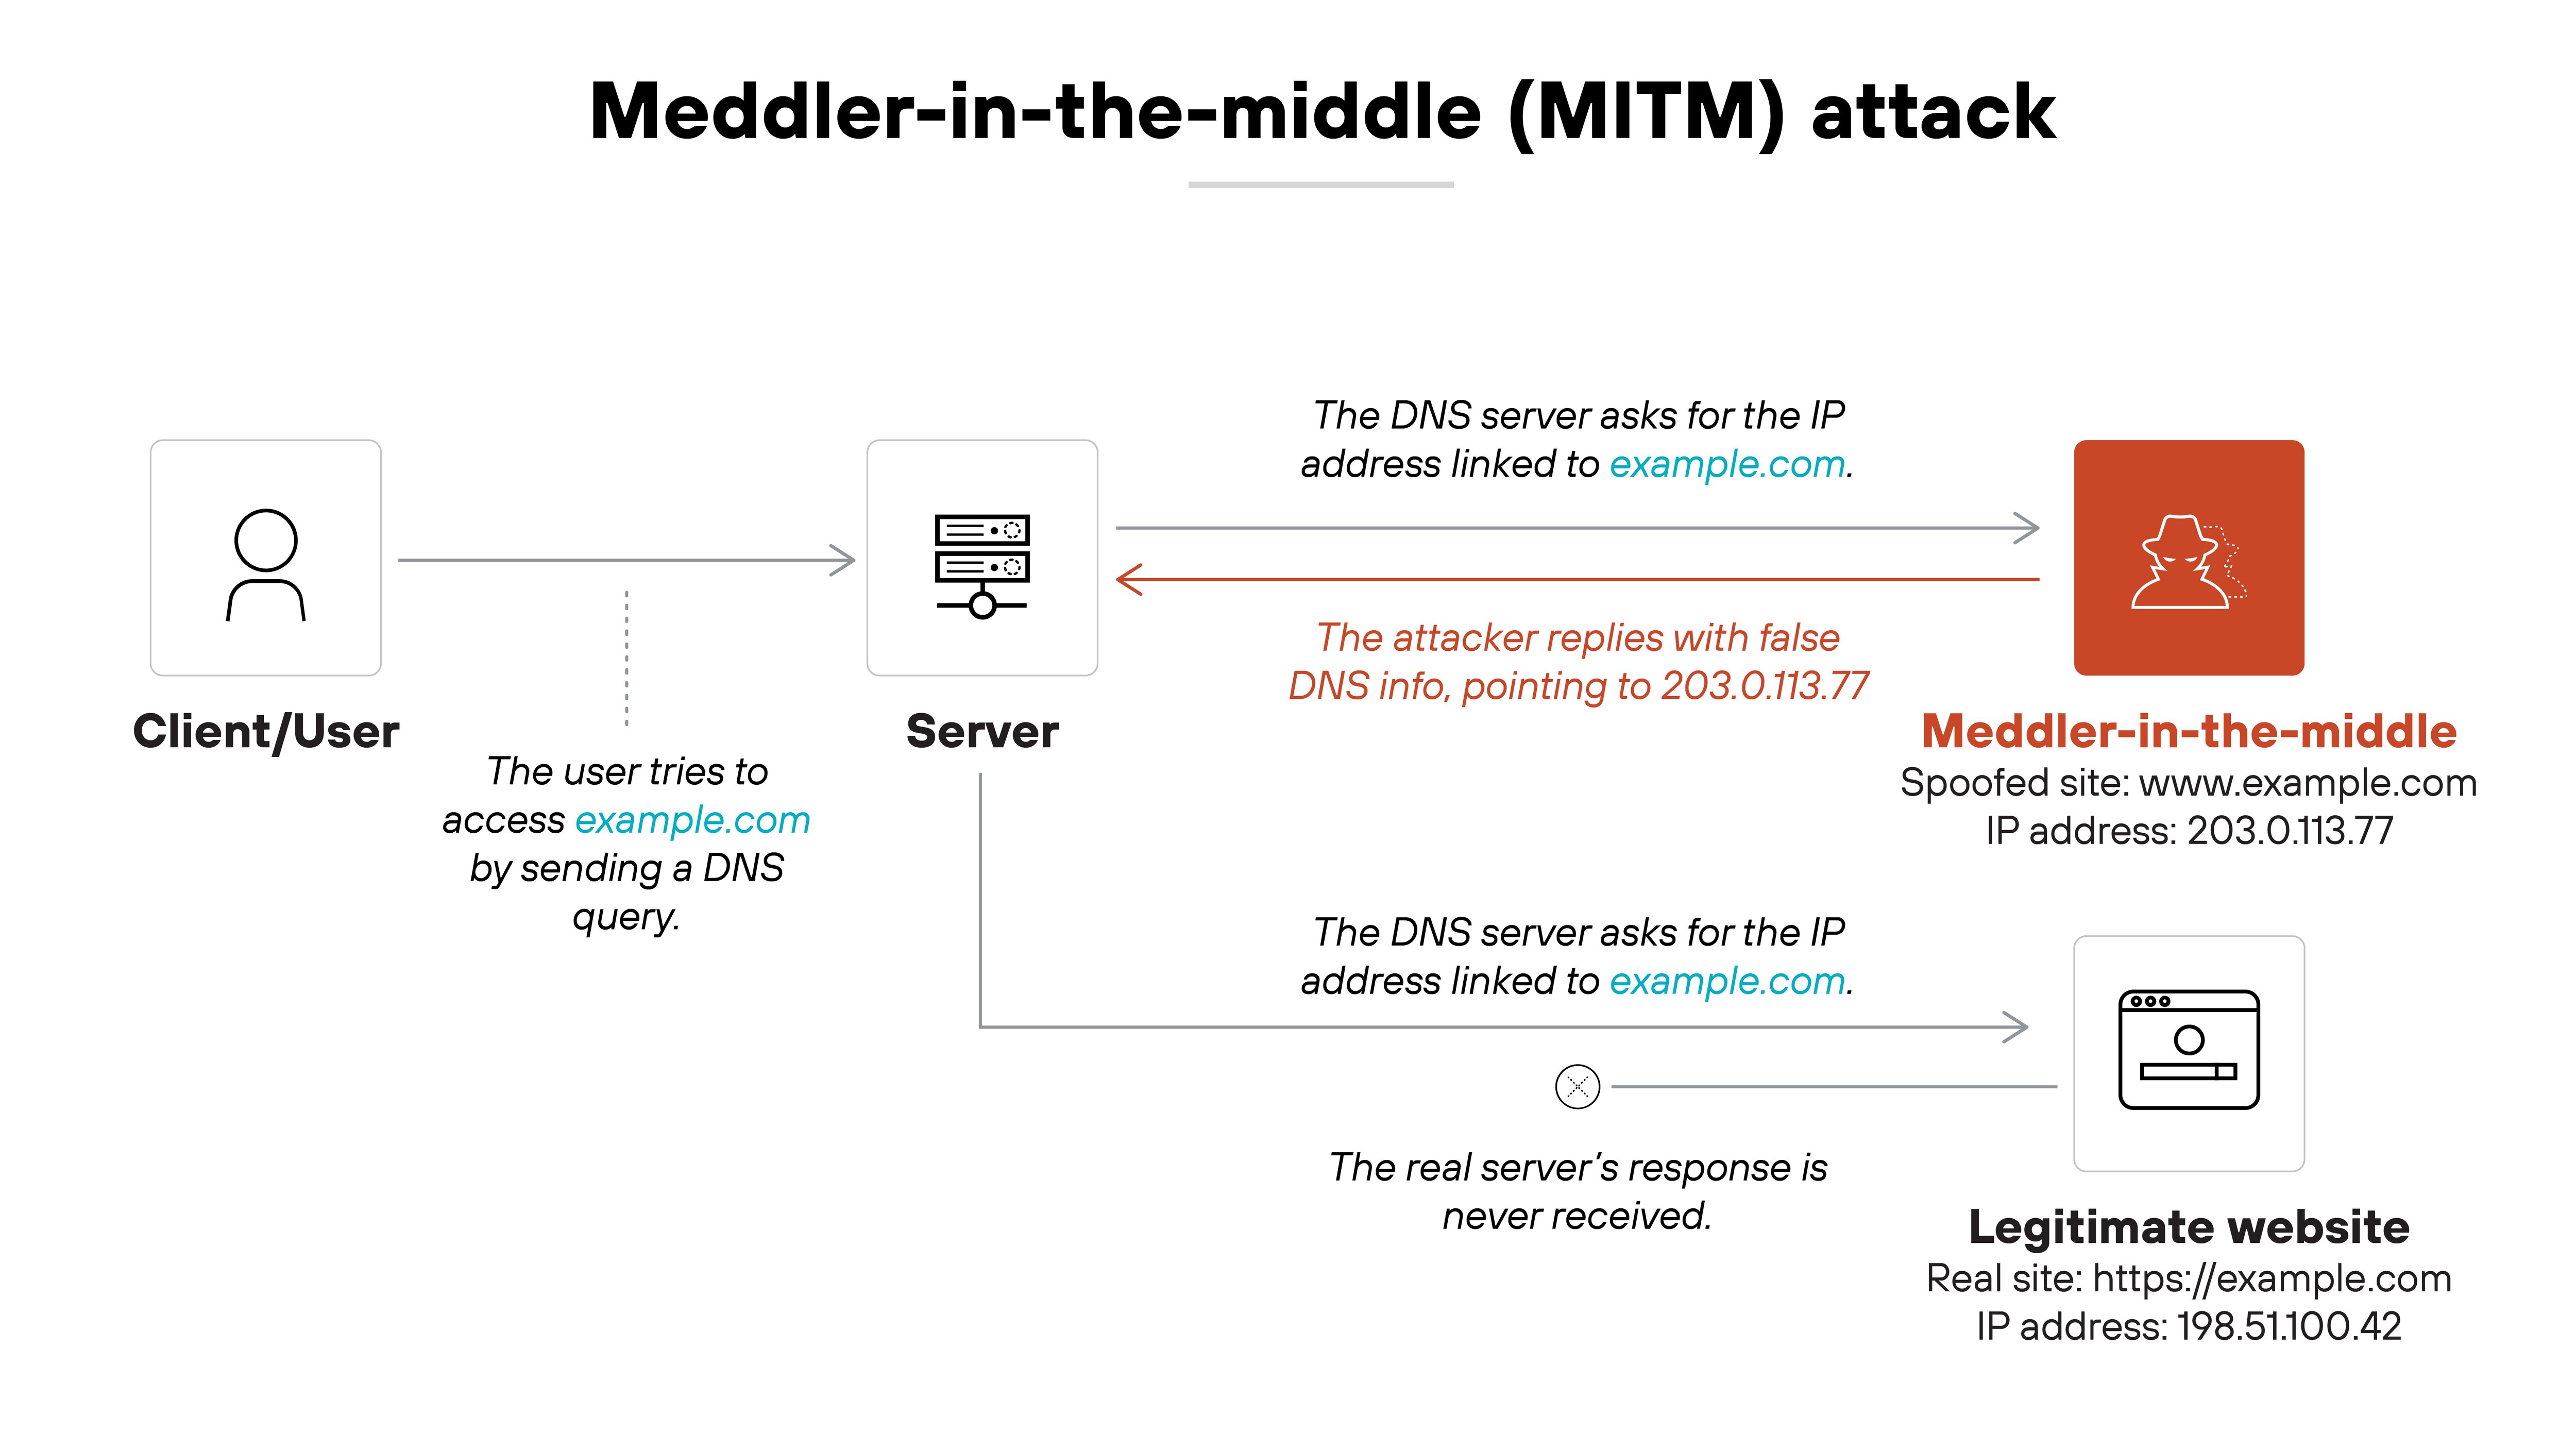
That forged response is accepted if the client doesn’t validate it. As a result, the user is redirected to a site controlled by the attacker. This attack is more likely to succeed on networks that lack DNS encryption or DNSSEC validation. It can also happen without the attacker needing access to any endpoint or server.
Example: TrickBot's shaDll Module (2023)
In 2023, cybersecurity researchers identified a TrickBot module named "shaDll" that facilitated MitM attacks.
| Module name | SHA256 hash |
|---|---|
| shadDll32 | 3f9c1b749e6d1e88aa45e8a274c1b5c1a213e0d46e672a5c029c5e79974db7f3
|
| shadDll64 | e8743c1fc51d2e49f79a1a3a4c7d99e713b217de08b5d2cd2f1d3f6c6436a8c4
|
This module installed illegitimate SSL certificates on infected computers, allowing attackers to intercept and manipulate web traffic. By redirecting web activity and injecting malicious code, the attackers could capture sensitive information from unsuspecting users.
Rogue DNS server
A rogue DNS server is a legitimate-appearing server that has been compromised or intentionally deployed by the attacker. When a user query reaches that server, it returns forged IP addresses for legitimate domains.
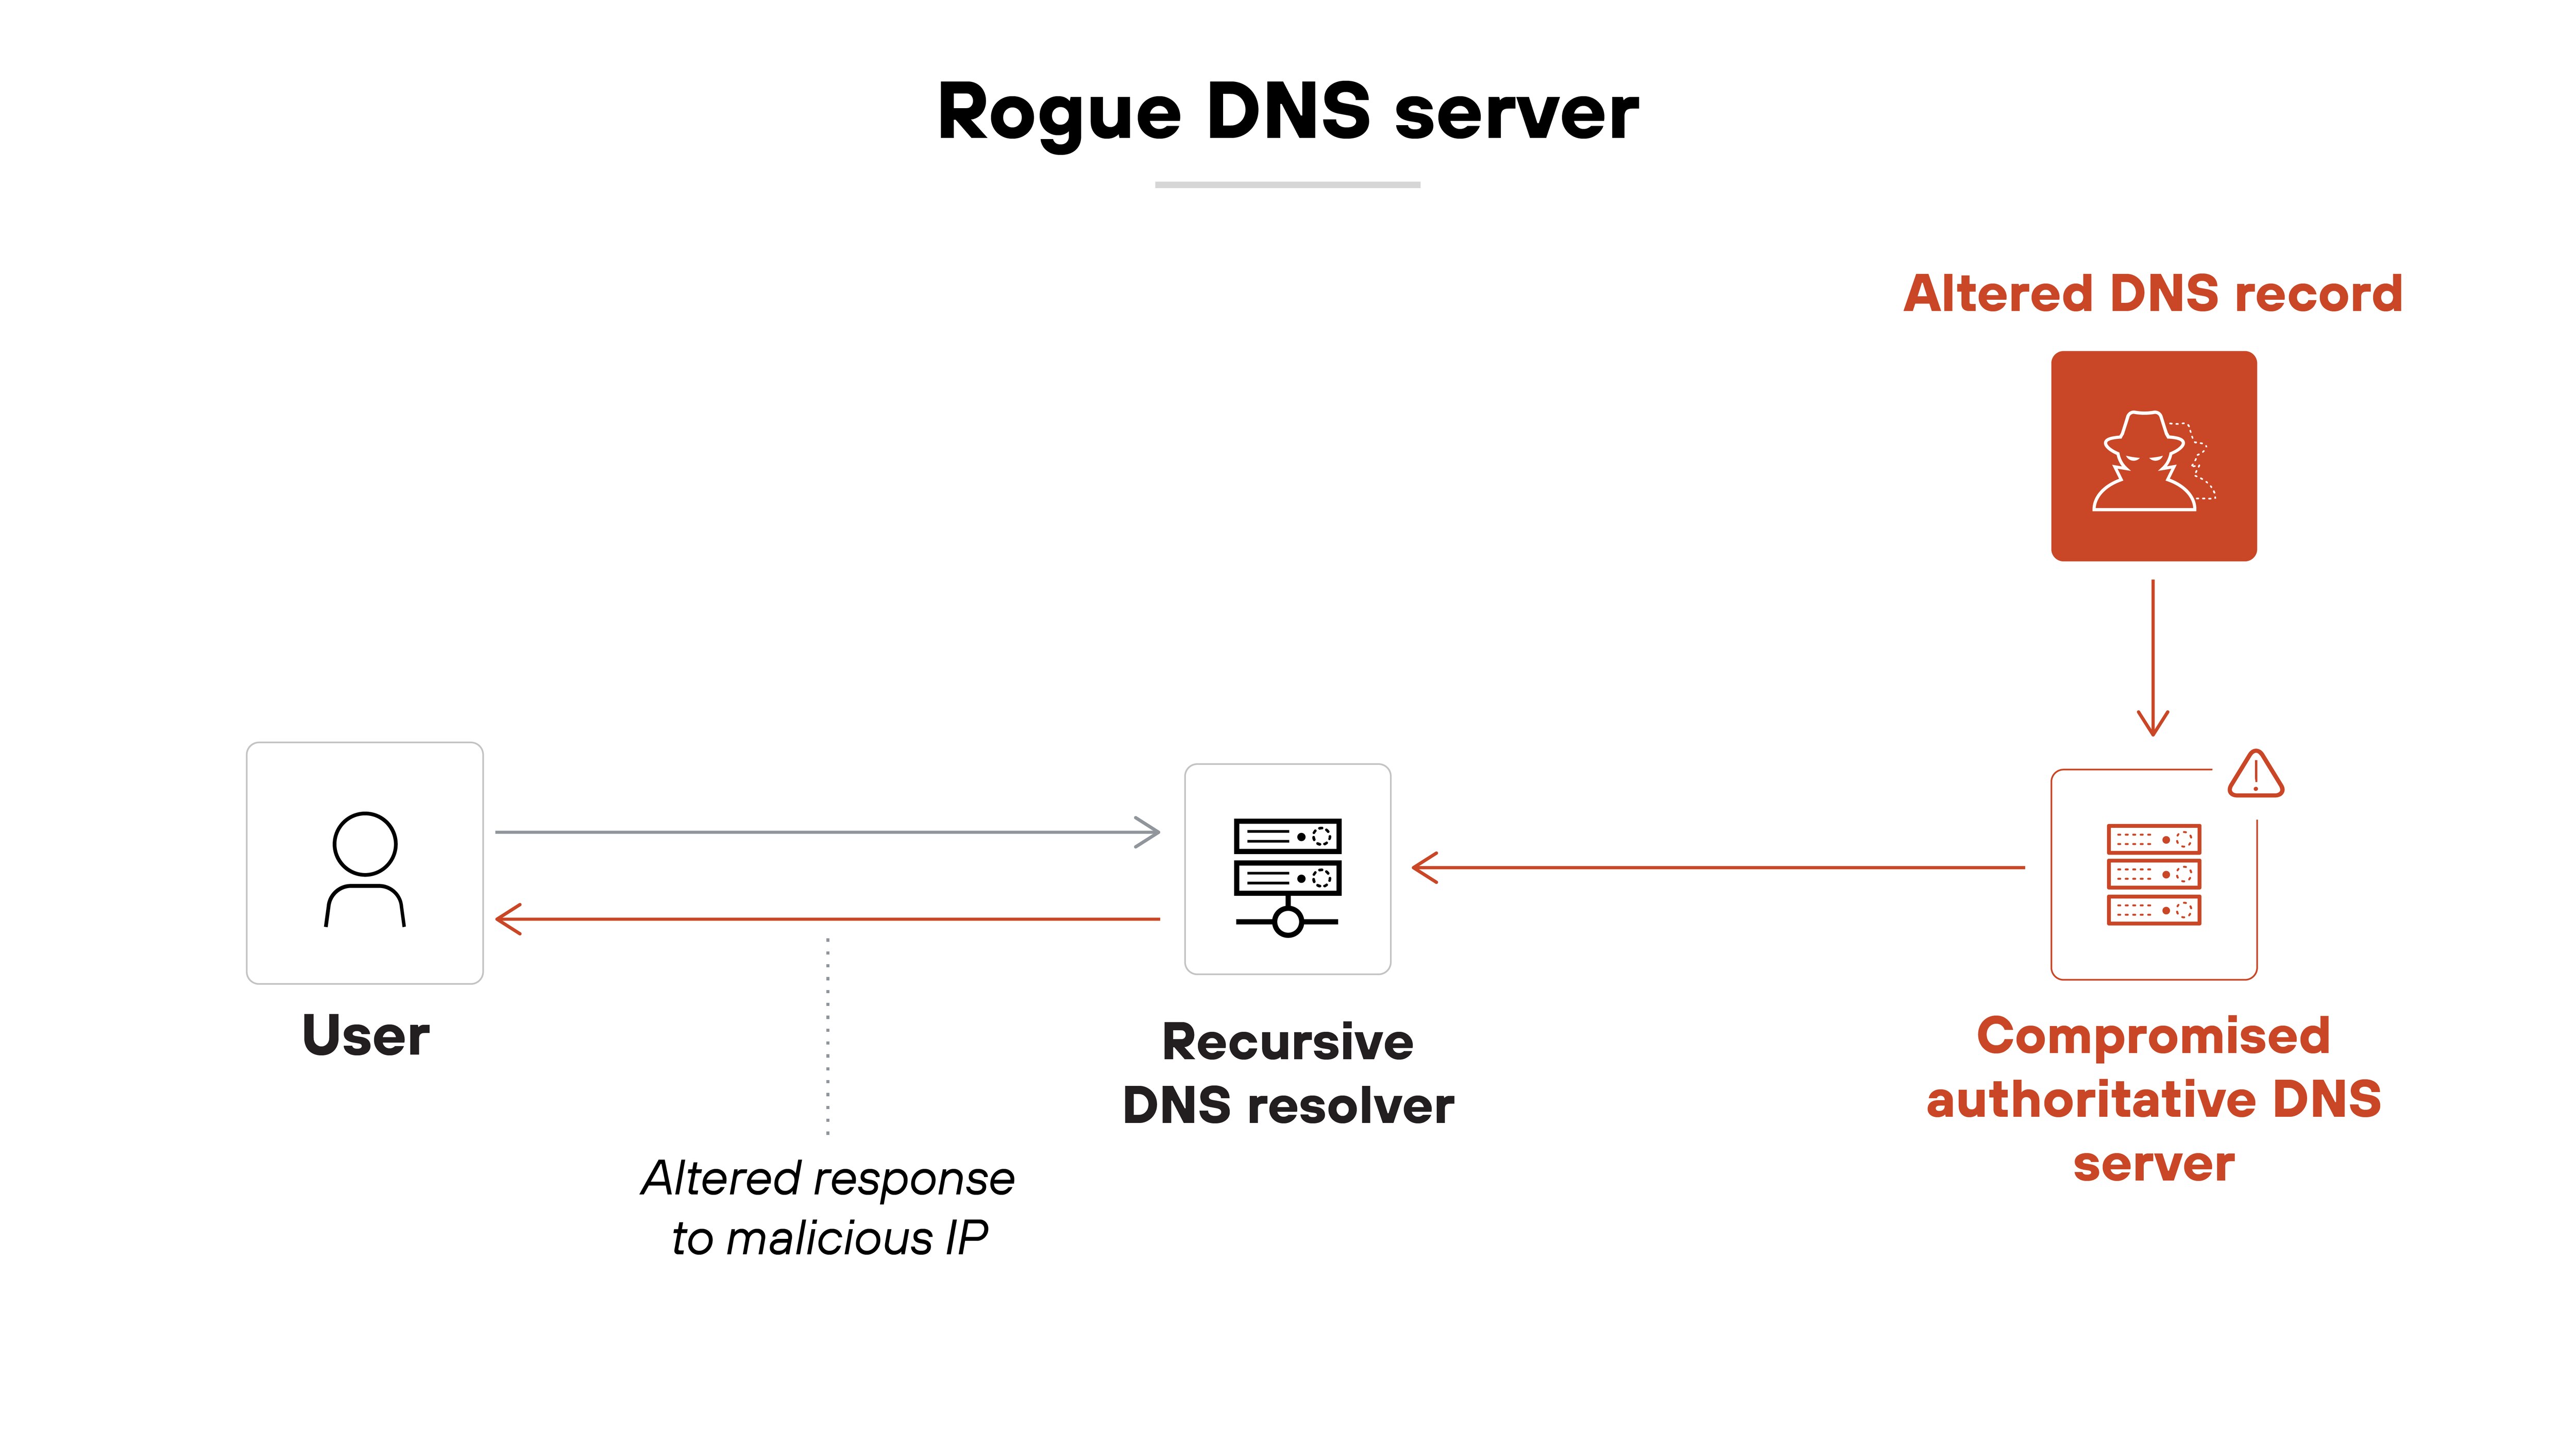
This technique works well when attackers can trick users or systems into using the rogue server. That could happen via malware, misconfiguration, or even upstream compromise of a public resolver. Once the rogue server is in place, the attacker controls the resolution process and can redirect as needed.
Example: DNS Predators Hijack Domains (2024)
In 2024, researchers uncovered that approximately 70,000 domains had been hijacked through compromised DNS servers.
![A timeline diagram shows the sequence of events for two domains hijacked in 2024 during a DNS record manipulation campaign. The top half is labeled 'TDS: aphecalenterprises[.]com' and lists four events. On March 7, 2019, La Container Inc. registers the domain with TierraNet. On December 6, 2021, La Container changes the domain registrant organization name to Aphecal Enterprises. On June 26, 2022, TierraNet transfers the domain to GoDaddy, though nameservers remain with TierraNet. On October 15, 2024, an entity named Horrid Hawk hijacks the domain and changes A records to malicious M247 IP addresses 38[.]180[.]226[.]70. The bottom half is labeled 'Landing: agbizwichita[.]prg' and also lists four events. On July 28, 2008, the Agri-Business Council of Wichita purchases the domain. On July 15, 2015, an unknown user creates a domain. On October 1, 2021, another unknown user registers the domain with GoDaddy and uses Linode DNS services. On October 17, 2024, Horrid Hawk hijacks the domain and changes A records to malicious DigitalOcean IP addresses 167[.]71[.]65[.]159. A caption at the bottom reads: 'Timeline of two domains hijacked in 2024 as part of a large-scale DNS record manipulation campaign.'](/content/dam/pan/en_US/images/cyberpedia/what-is-dns-hijacking/DNS Hijacking 2025_6.png)
Attackers altered DNS records to redirect legitimate traffic to malicious sites, exploiting vulnerabilities in domain management practices. This large-scale hijacking highlighted the critical need for robust DNS security measures.
How to protect against DNS hijacking

DNS hijacking isn't always easy to spot—and it's even harder to recover from once in motion.
Which means the best defense is a layered approach that spans detection, mitigation, and prevention.
Each plays a different role:
Detection focuses on spotting signs of tampering.
Mitigation addresses what to do if a hijack is already underway.
And prevention aims to block attacks before they start.
Let's break each one down.
Detection
Detecting DNS hijacking requires a mix of behavioral monitoring, network analysis, and system-level audits.
Here's how to break it down:
-
Monitor for unusual DNS behavior
Look for signs that DNS resolution isn't functioning as expected, such as:
Redirects to unfamiliar domains
SSL certificate mismatches on trusted sites
Browser security warnings despite no recent changes
Analyze DNS records at scale
At the network level, inspect DNS records for inconsistencies.
- Watch for new A or NS records pointing to unusual IP addresses
- Check for geographic or hosting shifts that don’t align with past patterns
- Use passive DNS (pDNS) to see how domains have resolved over time
Use automated detection systems
Well-tuned systems can catch anomalies before they escalate.
- Filter out known-good domains to reduce noise
- Flag records with unexpected changes, like long-established domains suddenly pointing to obscure IPs
- Correlate findings with WHOIS data and registrar updates
Apply machine learning for scoring
For large DNS datasets, models can help prioritize alerts.
- Analyze patterns across dozens of features, such as hosting churn or domain age
- Assign a risk score to each suspicious record
- Reduce false positives and surface high-likelihood threats for human review
Look for endpoint-level indicators
In smaller environments, detection often happens closer to the user.
- Notice slow-loading pages, pop-ups, or unfamiliar redirects
- Inspect local DNS settings for unauthorized changes
- Review resolver logs and DNS query paths regularly

Mitigation
Mitigating DNS hijacking means taking quick, focused action to stop the redirection and limit the damage.
Here’s how to approach it step by step:
Identify and restore affected DNS settings
Start by pinpointing where the redirection occurred:
- Check registrar accounts, DNS provider consoles, and router configuration
- Restore the correct DNS records for all impacted domains
- Temporarily redirect traffic away from attacker-controlled infrastructure if needed
Flush DNS caches across all layers
Remember: Correcting DNS settings isn’t enough on its own. Hijacked entries may remain in local and upstream caches.
Clear caches on browsers, local resolvers, recursive resolvers, and CDNs. Otherwise, users may still be routed to malicious destinations.
Investigate the cause of compromise
Understanding how the attack happened is critical for closing gaps.
- Review registrar access logs and audit recent DNS changes
- Check endpoints and routers for signs of malware or credential theft
- If an account was compromised, reset credentials and enforce MFA and IP allowlisting
Communicate with stakeholders
If users interact with a spoofed site, fast communication helps reduce further impact.
- Notify users, partners, or customers who may have been exposed
- Coordinate with internal security and legal teams
- In some cases, report the incident to DNS authorities or law enforcement
Prevention
Preventing DNS hijacking means reducing exposure across the systems and services that manage DNS.
Here’s how to build a strong defense:
Secure DNS management systems
Start by locking down the accounts and infrastructure that control DNS:
- Use strong, regularly rotated passwords
- Enable multi-factor authentication on registrar, provider, and router accounts
- Limit access to only trusted personnel and systems
Enable DNS-level protections
Add safeguards that validate DNS activity:
- Turn on DNSSEC to authenticate DNS responses and reduce spoofing
- Use client lock features at your registrar to prevent unauthorized changes
Harden DNS infrastructure and endpoints
Stop attackers from gaining a foothold:
- Separate authoritative name servers from resolvers
- Patch known vulnerabilities in DNS software and router firmware
- Restrict zone transfers to trusted hosts
- Scan endpoints regularly for malware
Audit for misconfigurations
Mismanaged records create easy openings.
- Remove stale, incorrect, or expired DNS entries
- Review DNS zones periodically to ensure everything is current
- Clean up unused records to reduce attack surface

| Attack type | Goal | Common methods | Target | Detection difficulity | Mitigation approach | Prevention approach |
|---|---|---|---|---|---|---|
| DNS hijacking | Redirect users to a malicious site by taking over or modifying DNS settings | Router compromise, DNS registrar account takeover, malware | DNS settings at the user, router, or domain registrar level | Moderate to high | Restore DNS settings, flush caches, secure access points | Use MFA, strong passwords, DNSSEC, regular audits |
| DNS spoofing | Alter DNS responses to mislead users without changing DNS settings | Man-in-the-middle attacks, forged DNS responses, redirection | DNS responses in transit or systems interpreting them | Moderate | Stop redirection, block malicious IPs or domains | Use encrypted DNS, monitor for spoofed responses |
| DNS cache poisoning | Insert forged DNS records into a resolver's cache to mislead multiple users | Flooding resolvers with fake responses, query ID prediction | Caching resolvers that serve DNS responses to many users | High, especially without DNSSEC | Flush cache, use DNSSEC, patch vulnerabilities | Deploy DNSSEC, use randomized query parameters, patch resolvers |
These terms are often used interchangeably—but they don’t mean the same thing. Each one describes a different technique for redirecting users to the wrong destination by manipulating the DNS resolution process. Knowing the differences can help teams understand the scope of an attack and respond appropriately.
DNS hijacking is the broadest category. It refers to any situation where DNS settings or behavior are maliciously altered to reroute traffic. That could mean changing router settings, compromising a DNS registrar account, or redirecting queries at the resolver level. The goal is to send users to an attacker-controlled destination while everything else appears normal.
DNS spoofing is a specific tactic used within hijacking. In spoofing attacks, the attacker forges a DNS response to trick a client or server into accepting a fake IP address for a domain. It’s often used in meddler-in-the-middle scenarios or captive networks to intercept traffic. Spoofing doesn’t necessarily require persistent access—it just needs the fake response to arrive before the real one.
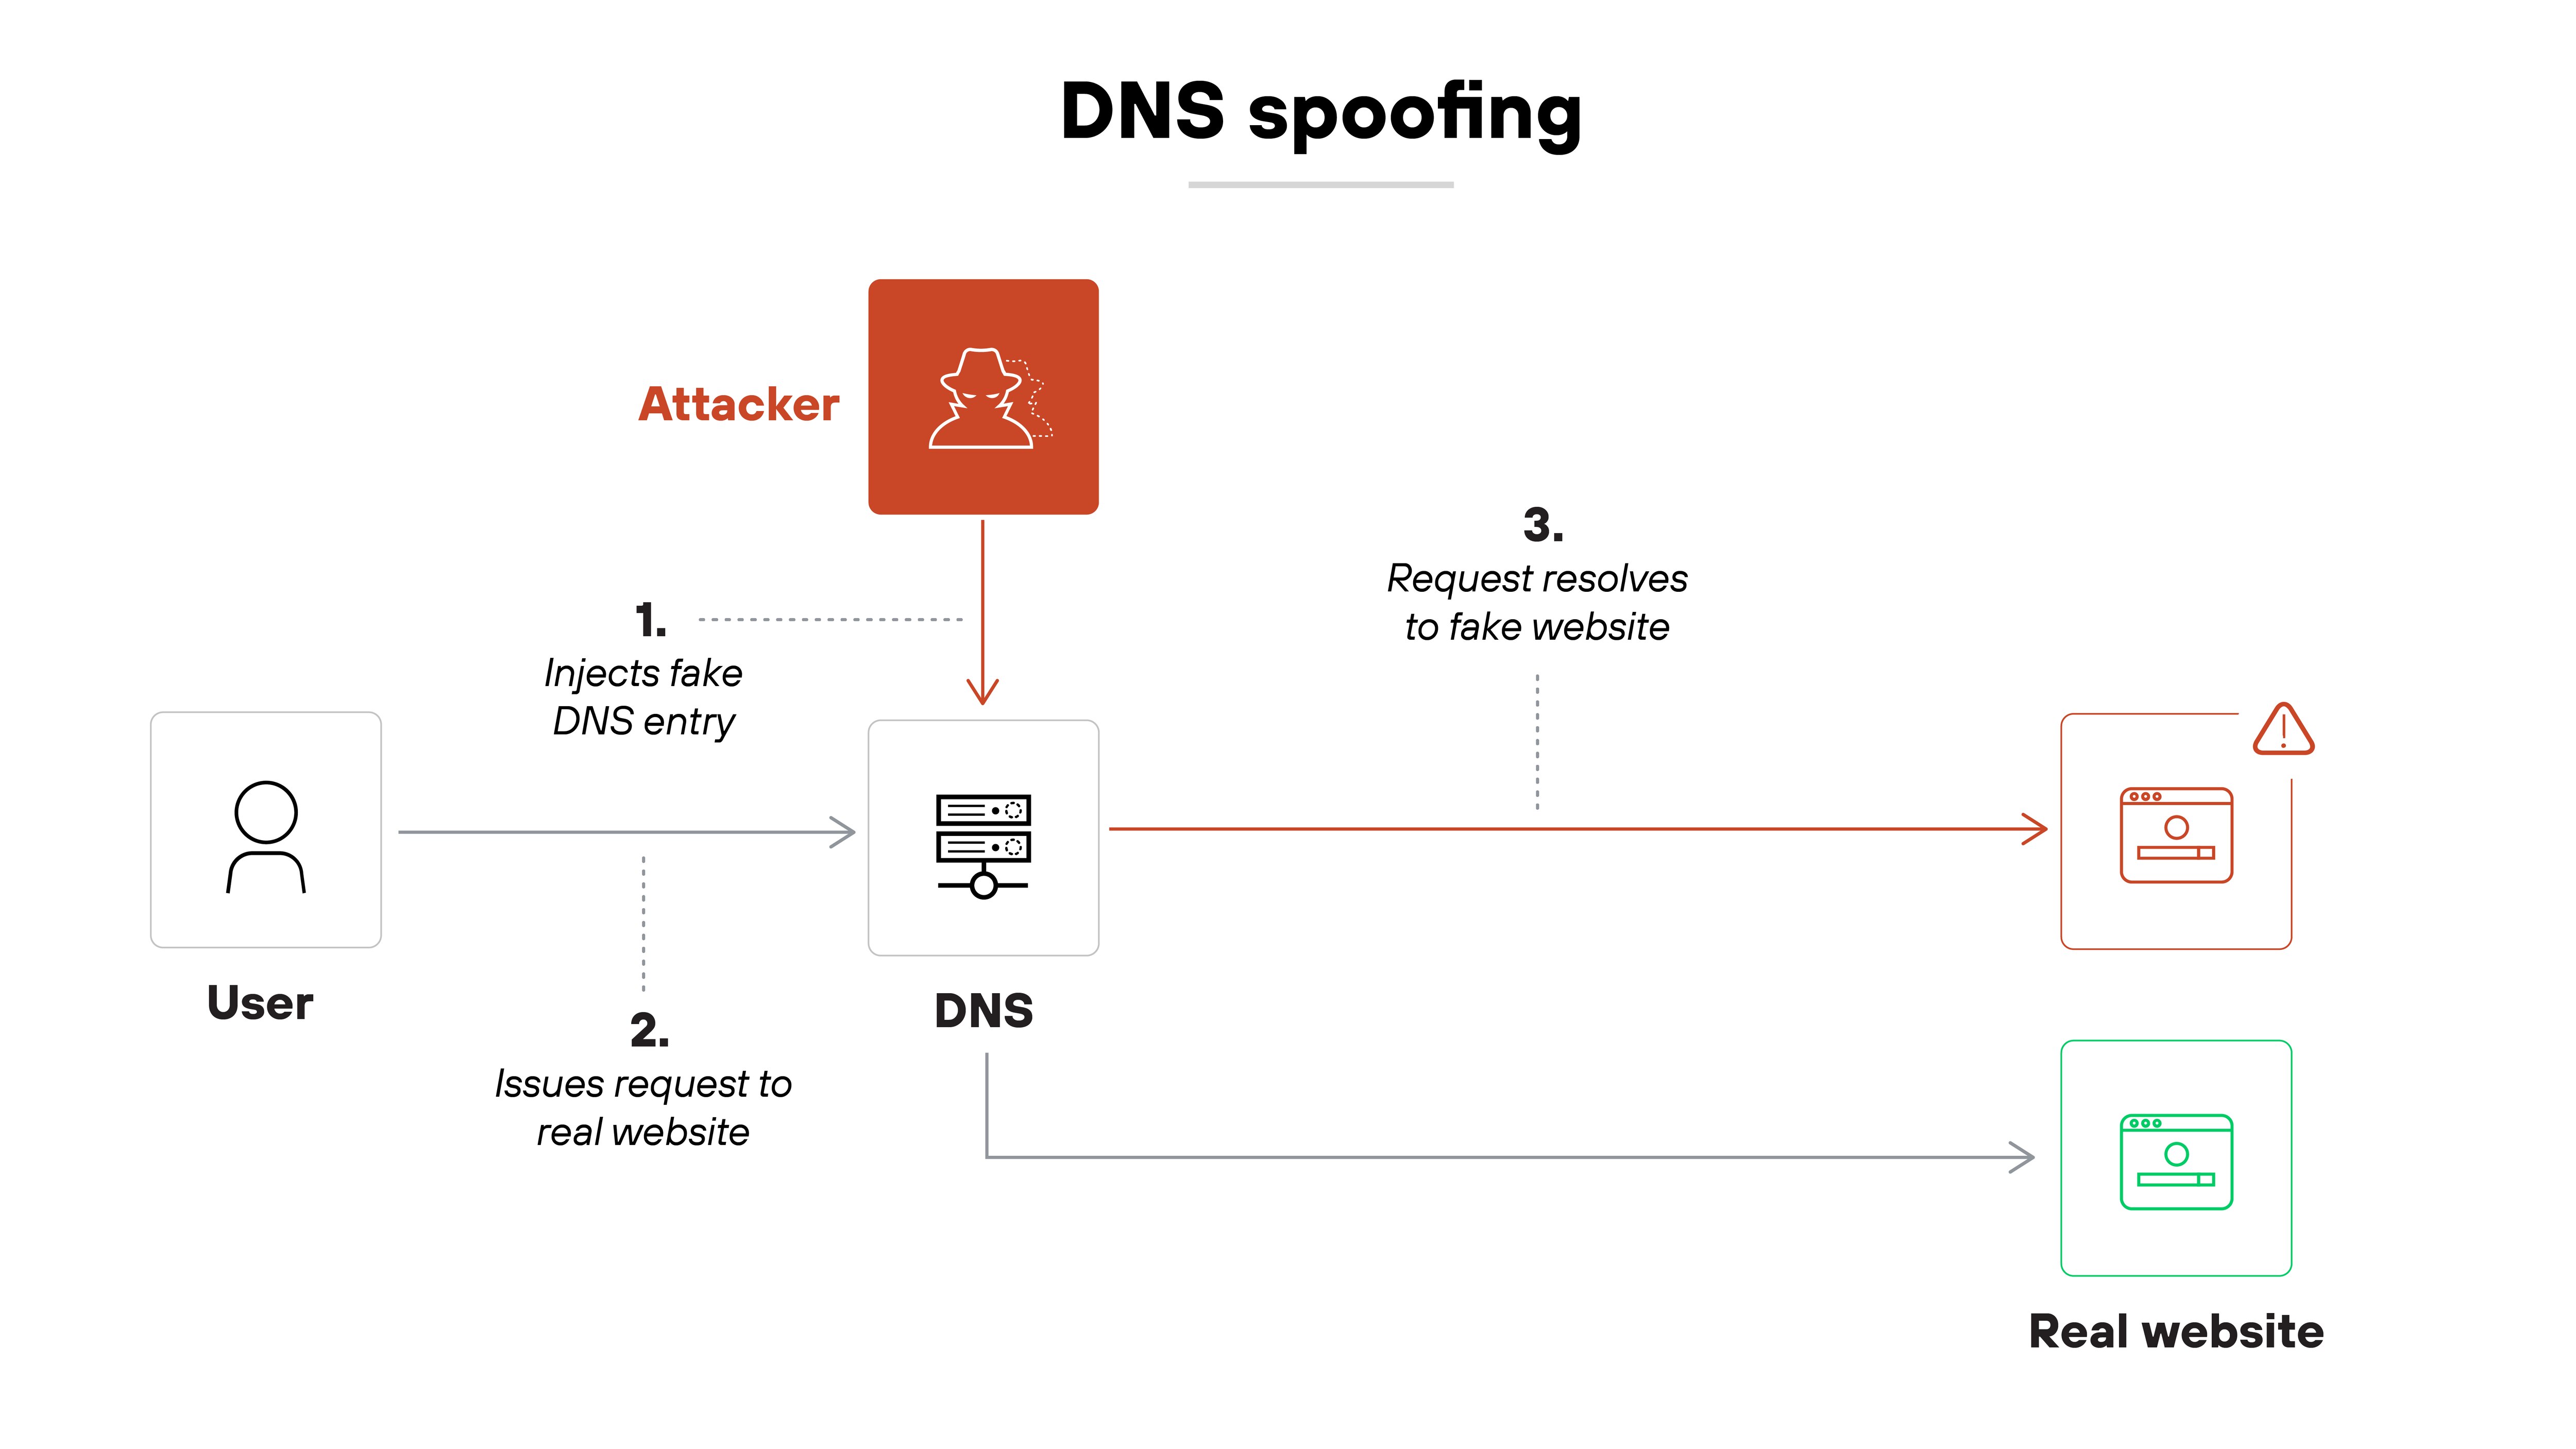
DNS cache poisoning targets recursive resolvers by injecting false DNS records into their cache. Once poisoned, the resolver returns the attacker’s response to every client until the entry expires or is cleared. This approach can impact many users at once and is especially dangerous when DNSSEC is not in use. Cache poisoning is one way to achieve DNS spoofing, but it’s not the only method.
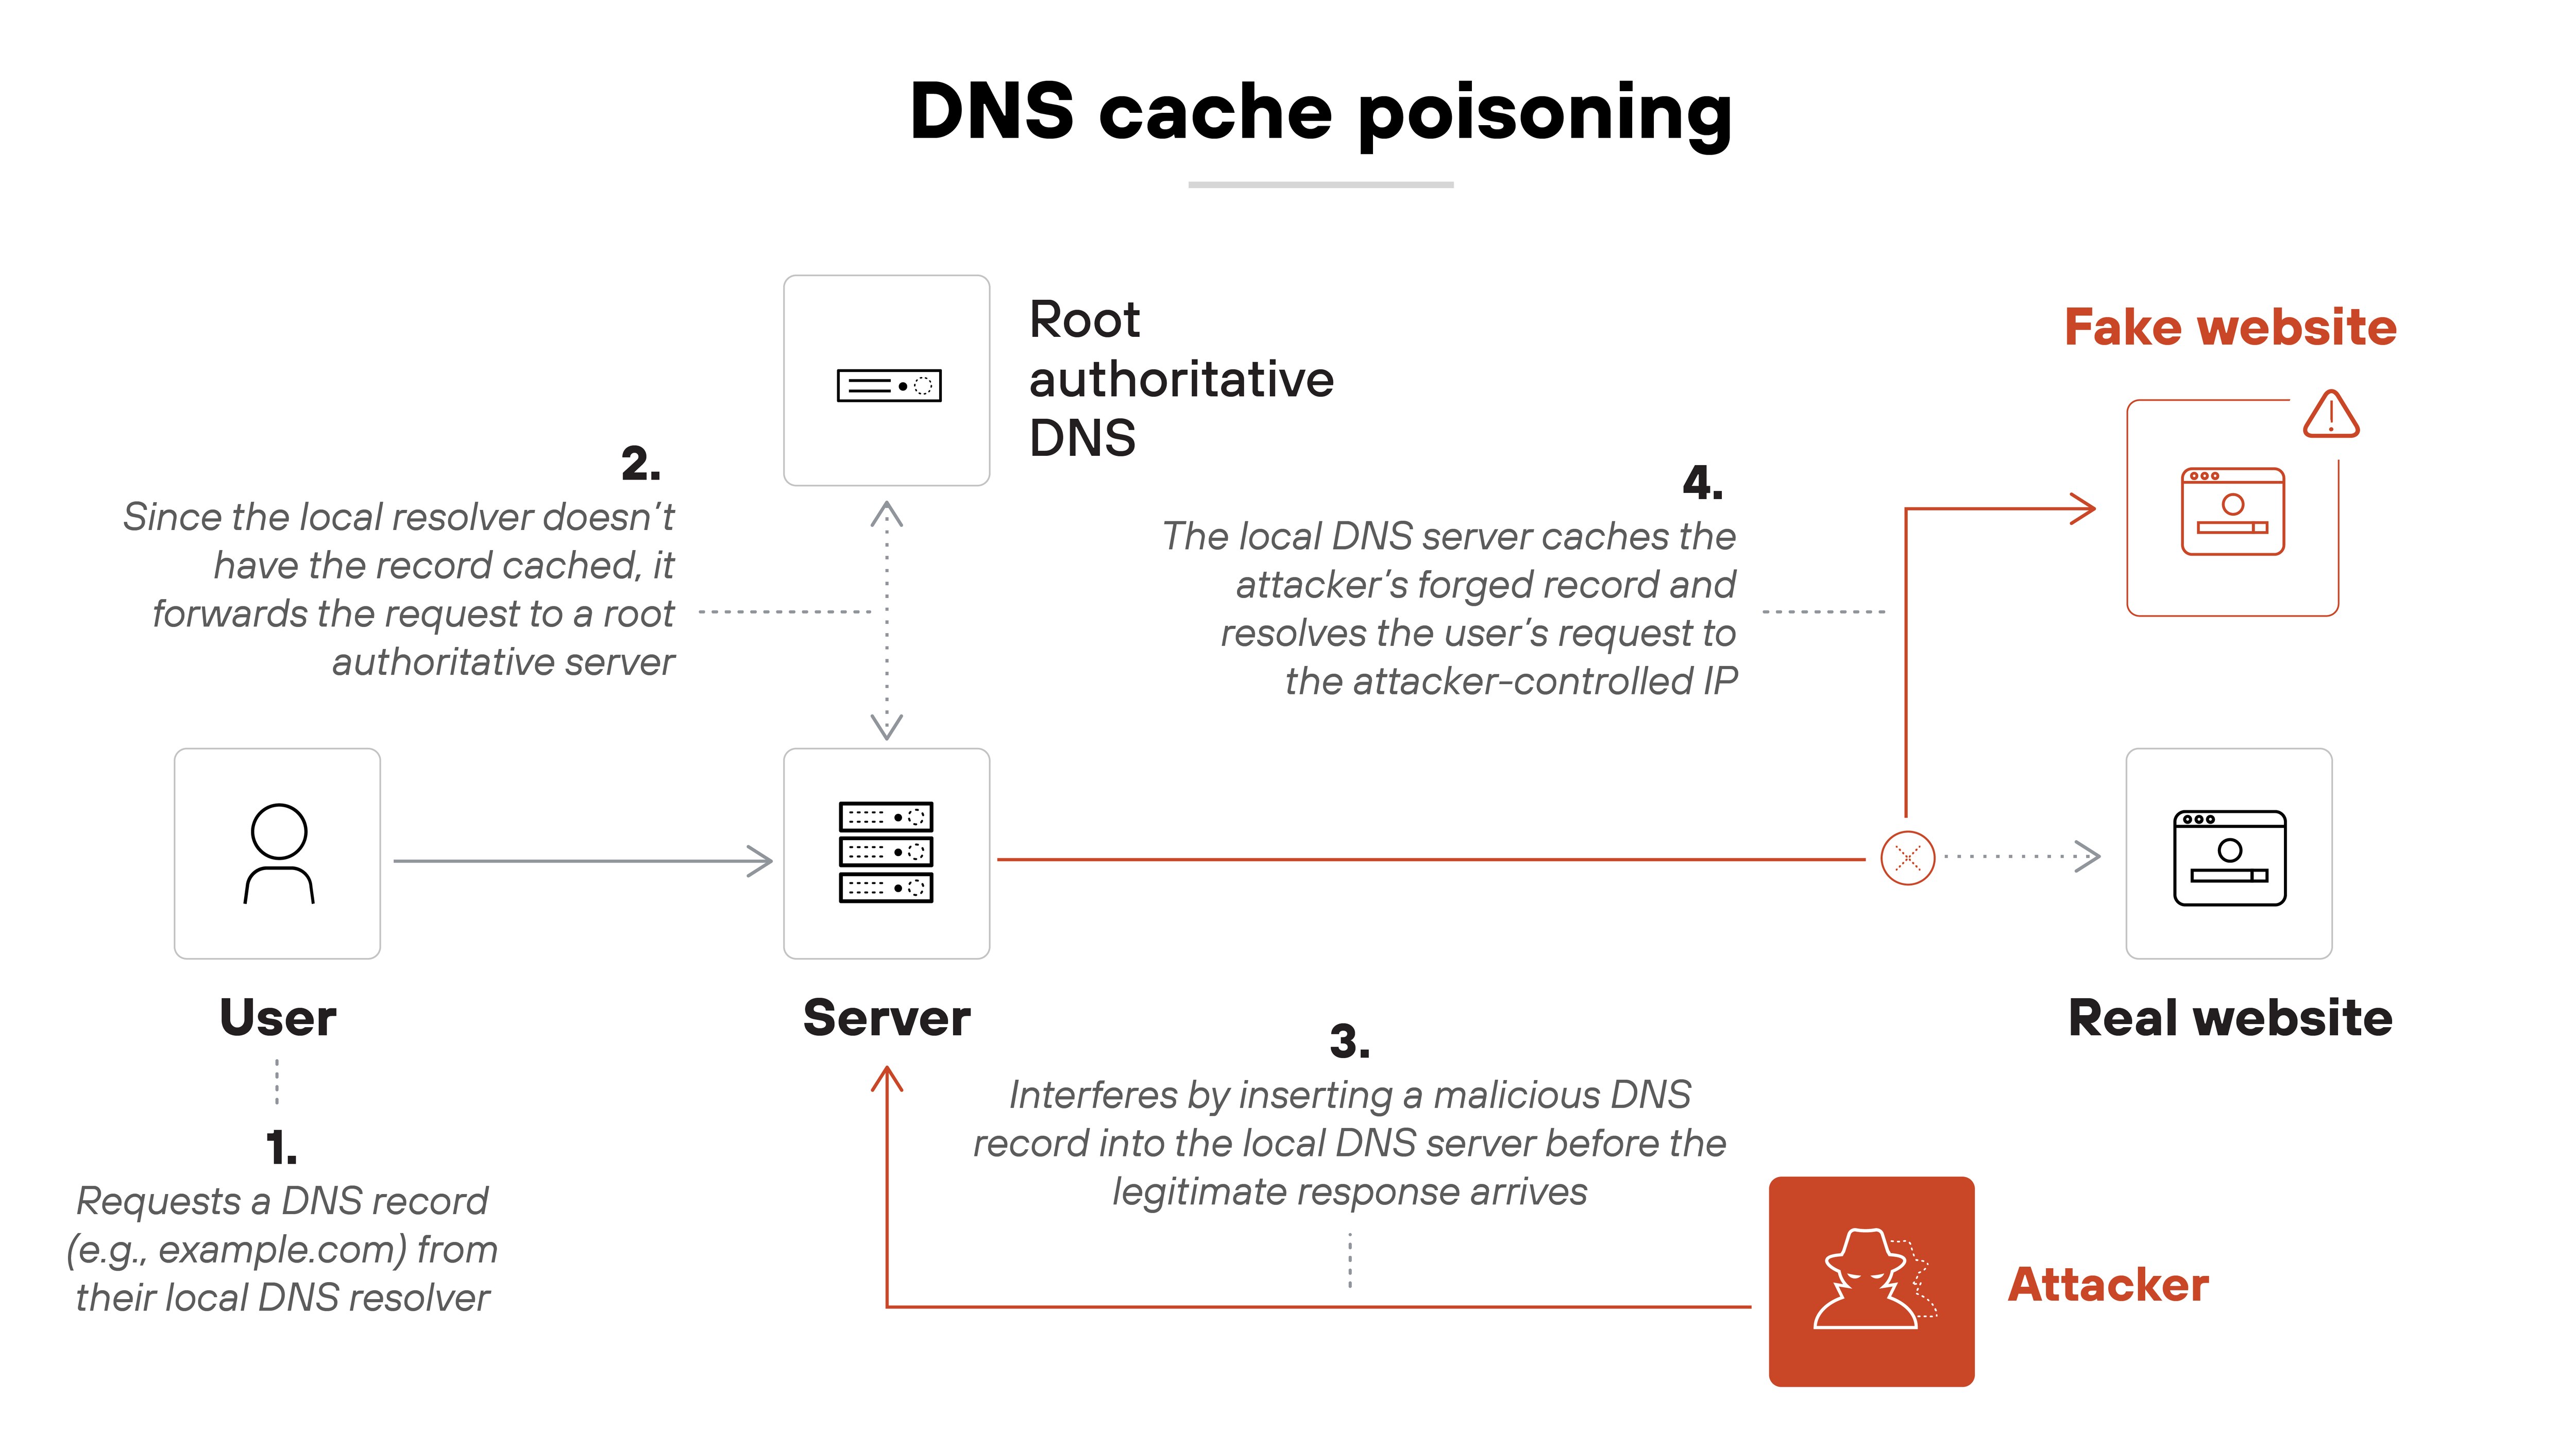
In other words:
DNS hijacking describes the overall compromise. DNS spoofing is how fake answers get delivered. And cache poisoning is one way those fake answers get stored and spread.
